Monday, November 4, 2013

Let's Get Sketchy and FALL


This week we had a great sketch by Brenshevia to use from Let's Get Sketchy. I just took family
photos in the fall of my son and family.. they were perfect with this sketch and 
the papers were fun with some cute accents.


Up close shows some of the cute accents.. here is chipboard fall and scarecrow and
the other accents are stickers.


More chipboard and stickers to compliment my page.


This fun corner has some burlap type ribbon tied in a know and
accented with some leaf stickers.

Thanks for stopping by.. and be sure to check what the other DT have to share with you too.

Photobucket

Friday, November 1, 2013

Robin's Nest DT Call


  • The Robin's Nest is having a DT Call and
  • I am excited to be submitting again and reapplying for the team. Originally I only had
  •  the clear dew drops  from the Robin's Nest Product line but OMG after being with the
  • team now for 4  months I have had the chance to use so much more of their
  • Product line... paper, accents and so many more gem stones I didn't even know they had.
  • There are many different themed papers and such an assortment of stone shapes and colours,
  •  journaling sheets, alpha stickers and so many more things I haven't even had time to use yet.
  • I am hoping to stick around again to get to use even more amazing products for the Robin's Nest line.

  • *************************************


I am so excited to share some really cute ideas for Christmas cards making different types of Christmas trees with tutorials.


1. Origami Christmas Tree 
Supply List:
Paper: Robin's Nest Christmas Tree, Black Distressed Stripe
Bling: Robin's Nest Dew Drops, Diamond Drops
Stickers: SRM Stickers


************************************


2. Folded Christmas Tree 
Supply List:
Paper: Robin's Nest Pink Flourish, Red Flourish, Canada Stripe
MME Blush 6x6 pad
Cardstock: black
Bling: Robin's Nest Dew Drops, Diamond Drops
Stickers: SRM Stickers
Ink: Ranger Distress Ink


***********************************


3. Strip Christmas Tree 
Supply List:
Paper: Robin's Nest Christmas Tree, Canada Stripe, Red Flourish
Bling: Robin's Nest Black Diamonds
Stickers: SRM Stickers 

This strips tree is so easy.. using scraps cut strips of 
different lengths from a wide base to tree top and one for the trunk. Accent and title any way you like and it's done.

********************************

Thanks for stopping by today.. sure
enjoyed sharing all these fun projects with you...
especially when I could show case a few of 
the Robin's Nest products.
to view many more items. 


Photobucket

Let's Get Sketchy and Sketch Inspired Magazine


To all my scrappy friends.. the newest, inspiring, creative, amazing sketches, fabulous on line
magazine... be sure to check it out.. and also check the publication calls for the next issue. We would love to see you pages in this magazine too..... 
Congrats to Let's Get Sketchy and Brenshevia on yet another adventure.


Monday, October 28, 2013

Robin's Nest.. more black n white..

For the month of October at the Robin's Nest we created with this amazing paper line 
and lots of the black n white prints that they carry.

With all the black n white .. and on the opposite side of the colours I thought
the split in the middle to start would be fun.
Then cutting lots of the clocks off the print paper and staggered up the
middle is a great base for more round photos.
Everything started larger at the bottom to
smaller at the top... it was perfect.
With all the black n white going on .. I decided that the touch of red would
be a perfect pop of colour.

Supply List:
Robin's Nest:
Gem Stones: White Dew Drops
Letters: Red Glitter Stickers
Other: ink, twine, tickets, black cardstock


In this close up we view the white dew drops accenting the corner.. and
also the red glitter alpha sticker letters.


More letters in this section and a fun mix of the cut out clocks.
What a great mix of papers and accents.
***************************************


I am loving this black n white Robin's Nest Products... and the
clocks are really cool to work with...even if all cut and pasted rather
than using the full sheet.
This photo is Easter this year.. me and the men in my life.. love
family get togethers and taking group photos.

Supply List:
Robin's Nest:
Gem Stones: White Dew Drops

Other: ink, twine, tickets, black cardstock

 Black n White Glitter Border and Swirls


\

******************************************* 
and here is my last layout for the month.


Supply List:
Robin's Nest:
Gem Stones: White Dew Drops
Letters: Red Glitter Stickers
Other: ink, twine, tickets, black cardstock


Be sure to rush to get in your order on the black n white.. on sale this month.

Photobucket

The Robin's Nest.. Masquerade Contest..Tutorials.. lots of black n white


The Robin's Nest is hosting a Masquerade Contest.. it is so much fun.
Create a mask using their products and enter.
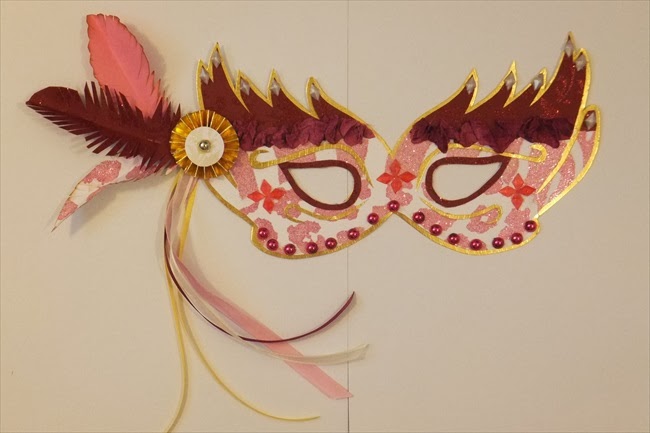
Here is my mask. 
Supply list:
Robin's Nest Products: 
Papers:
Gem Stones: 
Other: gold cardstock, ribbons

I started with just a base shaped mask which I ripped 3 different pieces of papers and layered
them across the base from bottom edge to top edge. I glued them down well and let them dry.
Then following the pattern on the back side and I cut the mask out. 
After that I started to decorate and accent it.. so many options depending
on what you find in your stash.
I didn't have feathers with me so I made them ... and 
also made the medallion or accordion flower from matching papers.


Below is the instructions for the feathers and medallion flower.

Here is the patterns to make some feathers by Lia Griffith:


Here is the link with instructions - http://liagriffith.com/paper-feathers-simple-to-make/

and also here is the video by me to make the accordion or medallion flower:


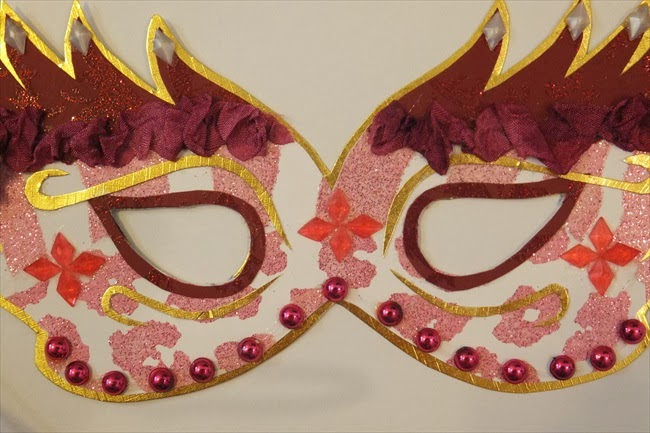
Lots of fun gem stones to bling up the mask.. they were a perfect touch.

Here is a template if you need a base to start with... increase it to actual size you'd like.

Below is the info about the contest.. sure hope you'll play along with us..
and you still have about 15 days to play along.

I used the shape of the mask from the poster below...
maybe that's what you'd like to do too... just increase the size when you print it.


For the month of October at the Robin's Nest we created with this amazing paper line 
and lots of the black n white prints that they carry.
I had so much fun making feathers I thought why not make some more but 
put them on a layout .. they were a perfect touch with the great
Robin's Nest product.

Supply List:
Robin's Nest:
Accent Sheets: Black Journaling
Other: gesso on paper, bling, ink, stamped title, old book paper 


In this close up you see bling.. homemade feathers using Robin's Nest Papers
and in the right side the start of a few Diamond Shaped Dew Drops.


Look at the amazing and fun clocks... what a great accent... and dew drop added to centres.


Behind the stamped title is a piece of the black journal sheet.
Thanks for visiting today.. I enjoyed sharing with you today.. and
be sure to come back again.

Photobucket

Thursday, October 24, 2013

Just Imagine Crafts and lots of circles


Just Imagine Crafts has the most amazing and best ever Kreaxions Circles Cutter.
It was perfect to use for all these circles that create this cute tree card.

The original idea is from my dear Friend Scarlett Symone and she supplied the main stencil
of the tree below. You add your trunk and accent and then start cutting many
sizes and colours of circles which you start glueing on and adding in layers to fill the tree. 


You have to cut this again to make the main frame of the card.. so folding paper in 
half .. lay the stencil to the left side of fold so the 2 left circles are NOT cut apart... 
and are the hinge to open the card.
The finished front is glued to the main frame after it's all done.


Here is a 2nd sample of this fun tree card... more circles in the form of gel dots and buttons on this one.
Thanks for stopping by and hope you enjoyed the tutorial for the tree card .
And thanks Scarlett for such a cool and fun idea to make this card.
Photobucket

Monday, October 21, 2013

Let's Get Sketchy


Let's Get Sketchy today has a sketch of mine.. and I played with digital to make this one.

Fun layers, great circles and cute cluster along with great photos. 
While I was creating this page using the
 above sketch I worked on the 2nd side of this double also below.


Celebrating a Grand daughter turning 16. So much fun .. great party, food and great occasion.
Stop by and see what the rest of the DT created using this sketch.
Photobucket

Sunday, October 20, 2013

Fall into Autumn

Lots of fun challenges to celebrate fall.
Here are a few to share with you.
Starting with this page..
On Just Imagine Crafts page I used Kreaxions Circle Cutter to cut the photo, mat it and
 add other circular accents on the page. I used this page also for a challenge
 at Cookin' Up Creations to create using many different shapes on your projects.
The background is stamped, chipboard sharps and some cute leaves.
Here are the close ups.
A mix of circles.

More circle rings and solid circles.

 Also added Kreaxions Punch #923 to add punched border accent.

This challenge at Turtle Soup suggested we use the word clustered accent on our page.
It was a perfect pennant with twine accent.

This double used fun background misting, masking and some paint.
Lots of fun layers with even a patch of burlap and old ripped book page.

On this side of the page the challenge included using some blackboard looking accent... so 
I cut a black accent and doodled using signo white gel pen.. and used a cute 
variegated jillibean soup owl.

Also this month I have been making some cute cards.

This challenge at Memorable Seasons was to take a shape....
 the acorn and rip papers to shape and fill the frame.
 I then added more layers to give more texture using 
variegated paper, some fun stitching and twine accent.

 Thanks for your visit.. and hope to see you again soon.
Photobucket