Saturday, March 30, 2019

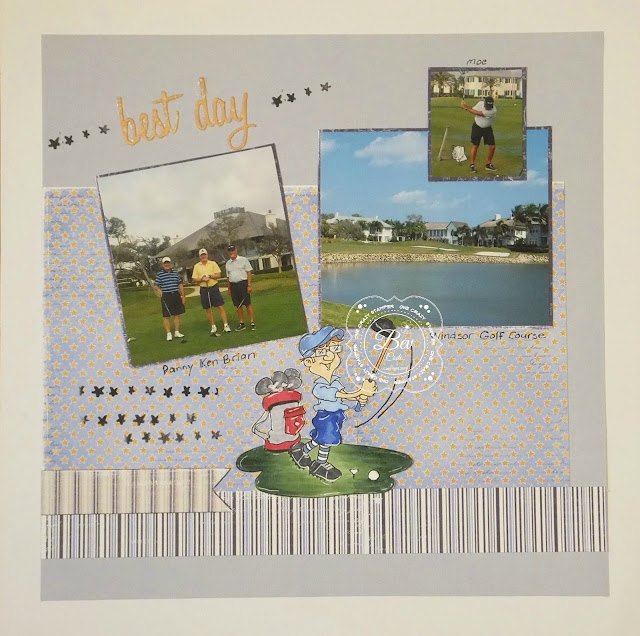
Bob Loves Golf High Hopes Stamp on Layout Saturday at One Crazy Stamper

Welcome OCS Fans;

Hi it's Bev here today ... for Saturday layout projects for One Crazy Stampers using High Hopes Stamps. I also am thrilled to tell you that I will not be doing cards but scrapbook layout pages and some of the accents will be co-ordinating stamps for the themes of the projects. It should be great fun. I will be sharing with you every Saturday so mark your calanders ... I would love to see you again.


To start my project I stamped the image  .... Bob loves Golf


It was then coloured using copic markers and the highlights are signo white gel pen.


To create this page I used Scrap n Sketch #173 above to inspire my page.


Supplies used:
  • Stamp:  Bob Loves Golf T517
  • Copic Markers: 0. C0, C01, C03, C5, C8, B000, B00, B02, B06, R24, R27, E00, E01, E55, E57, E59, W5, W7, G12, G21, G24     
  • Paper: Maja Design Life by the Sea
  • Other: signo white gel pen, cardstock, ink roller. die cut. Scrap n Sketch #173
Be sure to stop by the One Crazy Stamper blog and Facebook Page for some daily inspiration from the Design Team Divas.  You can also follow us on Instagram, Twitter and Pinterest.
Thanks for stopping by and have a fantastic day.
Hugs, 


Thursday, March 28, 2019

Ann Butler Designs Iridescents on Journal Page

Iridescent on Journaling Page


I created this Journal page and  I am showcasing Iridescents on the background over stickers and also on chipboard accents.


I created this page celebrating my famil with the brids and groom at a cottage wedding.

Here are a few close views to showcasing the details


Step 1:

These photos show the close ups so you can view better the details. I started with some stickers first.


Step 2:
I then brushed some iridescents over the stickers and in splatter type spots on the overall page.


Step 3:

Sheer gold pearl Iridescent is used to accent the chipboard accents. (this is my favour gold accent for chipboards as it matches so many colour options.)


Step 3:

Here are the 2 photos with the finished chipboard sections.


Step 4:

This photo shows the central section with a matted photo which is foam popped up to raise it above the section of chipboard.

Ann Butler Designs Products used:

Ann Butler's Design Iridescents: Sheer Gold Pearl, Orchid, Limelight

Other Products:

  • Journal Album
  • Beads
  • Creative Embellishments Chipboard
  • Stickers
  • Cardstock
  • 3D foam
  • Beacon 3-in-1 glue
  • Paper trimmer
  • Flowers


Wednesday, March 27, 2019

Buncha Scraps Beauty in Bloom celebrates my Grand Babies


Welcome to Buncha Scraps one of my newest adventures with digital scrapbooking. Dina has amazing digi collections and I will be showcasing 2 different collections every month with you. Be sure to visit often to view what I am creating. You can also find lots of her collections on My Memories site also at Buncha Scraps.

For this super fun grandkids page.... them spending time at the cottage I am using Beauty in Bloom.... with lots of fun, bright colours and coordinating accents and titles. This is the kids when Jake was just 1 year of age which puts them at age 4 and 6. OMG aren't they just too cute. I loved their many sleep overs together... and they still get along well today at 17, 21, 23.

For this page I started with all the different print paper layers and sizes in clustered sections... and added some plain colours too. I added photos and started positioning some accents. Things didn't look quite right yet so I wanted to add something in the open space.
Shadowing gives the page depth and demension and my page is done.


For this I pulled in 4 square shapes and matched the colours to the papers behind as per above. They were sized to fit inside each other in layers to form a frame. When they are all together I add them as a Group to keep them bundled so I can move and put the layers behind all the photos and papers. This was the only tricky part.... but it looks great. Now for the next issue.... I also grabbed a straight line, colour matched, and then added zig zag style, joined 2 together, Grouped them, Copy and pasted 3 rows of them and the clustered stitches were done now too.

Collection used:


This is Beauty in Bloom Collection and it is fabulous for all your soft elegant pages, spring, girlie projects. What an amazing mix of colours and accents to use when creating. Thanks for stopping by. Hope to see you again soon.

Tuesday, March 26, 2019

Another Masculine Birthday Card at Dies R Us


Hi .. How are you today. This DT project for Dies R Us showcases a masculine birthday card made using an Amy Design Vintage Vehicles Frame Die along with Scraperfect Best Glue Ever with the non clog writing tip. For this card I started with the base die cut background, die cut again just the car piece and 2 gears pieces .... then matted the black behind the car... for depth and dimension. Lastly the die cut Tim Holtz Celebration Words sentiment and it's a perfect masculine card for all those boys and men in your life  by just changing up the sentiment.

Supply List:
Machine/ tools: Big Shot Express, Misti
Other: Cardstock, paper


In the close up view you can see the amazing details in all the cuts all around the frame. Plane, Bike, tools and gears to mention a few. The background is matted for depth and dimension while the rest is very plain. 
The sentiment is was cut in matching cardstock to match the frame. ... so simple and easy but what an amazing masculine card.


Don't forget to come join in the fun at the Dies R Us Challenge Blog.  There's a new challenge theme offered on the 1st and 15th of each month and one lucky randomly drawn winner will receive a gift voucher prize to the Dies R Us Store.  For your convenience, all the important Dies R Us links are provided below.
click below for:

Thanks for visiting... hope to see you again soon, Have a great day.


Monday, March 25, 2019

49 and Market Products at The Rubber Buggy


Hi... Bev here today at The Rubber Buggy.  I am sharing this page showcasing Jules playing soccer when she was little. For this project I am using 49 and Market products - Captured Adventures paper Collection - their chipboard set - their stamp and flowers. 

The Rubber Buggy Products:


For this page I am using the Let's Get Sketchy sketch so I worked on the base background following the sketch below.


From there I laid out the proposed positioning of the photos and the image and also placed some accent pieces where I hoped they would suit.


I did some stamping in the areas around the photos - above and below.


In the close ups you get a better view of the details.


Chippies and flower cluster.


Central section with lots of accents but the photos are still front and centre.


Thanks for stopping by... hope to see you again soon
.... but in the mean time be sure to stop by the STORE where these items and so many others are available. Also take note of all the products that aren't carried in our regular local stores. ... AND the service is A1. 


Sunday, March 24, 2019

Mintay Life Stories reveal video


hi.. Here is the product reveal for Mintay Life Stories..... amazing combo and colours. Be sure to view video in full size. Then view The Rubber Buggy STORE for this product and so many others that are available. Their are so many product lines that are not normally carried at The Rubber Buggy. Thanks for stopping by... see you again soon.


Saturday, March 23, 2019

Soccer Happy Moments for One Crazy Stamper

Welcome OCS Fans;

Hi it's Bev here today again sharing layout page for my DT project for One Crazy Stampers using High Hopes Stamps. I also am thrilled to tell you that I will not be doing cards but scrapbook layout pages and some of the accents will be co-ordinating stamps for the themes of the projects. It should be great fun. This page showcases Jules playing soccer when she was little. I am sharing this at One Crazy Stamper  using High Hopes Stamp Soccer Star TT036.


To start this page I stamped the image and then copic coloured it using some of the colours from the photos to match thing up. I then highlights image with signo white gel pen.


For this page I am using the Let's Get Sketchy sketch so I worked on the base background following the sketch below.


From there I laid out the proposed positioning of the photos and the image and also placed some accent pieces where I hoped they would suit.


I did some stamping in the areas around the photos - above and below.


In the close ups you gat a better view of the details.


Chippies and flower cluster.


Central section with lots of accents but the photos and stamped image are still front and centre.

Supplies used:
  • Stamp: Soccer Star TT036
  • Copic Markers: 0. C0, C01, C03, C5, C8, B000, B12, B14, B16, E00, E01, E55, E57, E59, W5, W7 
  • Paper: 49 and Market Captured Adventures
  • Accents: 49 and Market Laser Cut Shapes Happy Moments, Botanical Pot pourri Marina Flowers and Stamp.
  • Other: signo white gel pen, cardstock, Ink Roller, 
  • Sketch: Let's Get Sketchy
Be sure to stop by the One Crazy Stamper blog and Facebook Page for some daily inspiration from the Design Team Divas.  You can also follow us on Instagram, Twitter and Pinterest.
Thanks for stopping by and have a fantastic day.
Hugs,