Thursday, September 27, 2018

Ann Butler Designs super fun Stamped Canvas Bag

Amazing Stamped Canvas Tote

Create this Amazing Canvas Tote Stamped for yourself or as a gift for that special friend.  Stamping makes creating so easy and mix and match stamps make creating patterns so fabulous.

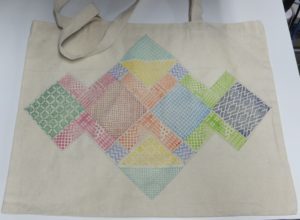
This tote will be perfect to carry so many things including your crafty projects your working on.

Step 1:

Gather all of your supplies and start with a bunch of stamps you would like to use and lay them out in a proposed pattern.... with estimated positioning.
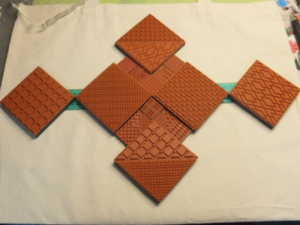
 

Step 2:
 
Using a single stamp at a time stamp each one... using a mixed colour combo available from the fabulous Color Box Ann Butler's inks for Fabric, Wood and More.

Step 3:

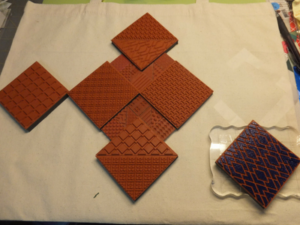
Continue the stamping in the proposed design.
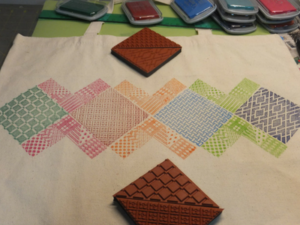
 

Step 4:

Start expanding the stamped pattern after the main central section is done. It is easy now to fit each piece now to fit together. There are small, medium and large pieces that all intermingle to design with.
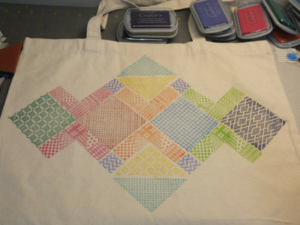
 

Step 5:

When it's all stamped I then added some sewing machine stitching to complete the look of a patchwork quilt on the tote bag.
 

Step 6:

Setting the inks either slow drying or heat setting will allow you to wash and keep this tote clean.

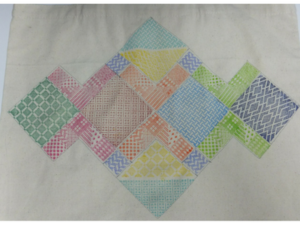
That’s it, you’re done!  Now enjoy using your stamped tote for yourself or a friend for so many uses.

Ann Butler Products Used:

Ann ButlerColor box Background Basics Stamps, Checks 1, Diamond 1, Picnic 1, Picnic 2
Ann Butler Designs Ez-De’s Faux Quilting Stamps: 1″ and 2″ Squares
Ann Butler Crafter’s Ink by Clearsnap Evergreen, Limelight, Canyon, Berry, Lilac, Breeze, Aquamarine, Sunshine, Tangelo, Blueberry
Other Products:
  • Canvas Tote Bag
  • Heat Tool
  • Sewing Machine
  • Thread
  • Needle
 

Monday, September 24, 2018

The Rubber Buggy Die Cut Christmas Card


Hi .. How are you today. This DT project for The Rubber Buggy showcases a Christmas card made using some die cuts along with  Beacon 3- in -1 Glue. The Sentiment is Glossy Accented to make it simmer and the gold accents and washi tape are from Paper House. 

Supply List:
Ink: Tim Holtz Vintage Photo
Accents: Glossy Accents
Machine/ tools: Big Shot Express,
Other: Cardstock, Paper House

\
To start I found this fun print and the negative die cuts. I then cut the black cardstock to mat it.

Glue the print to the background.

Used just a plain white cardstock Sentiment so it would pop off the already busy card.

Here is the close up view of the sentiment after the Glossy Accents was applied.

In the close ups you can view the details of the fabulous designs in the die cuts.

I love this amazing paper print and the black background made it all pop. It is so elegant and also love that it is a non conventional christmas paper.

This was a busy card but after taking a good luck I thought the fun shiny gold accents would be a perfect fit to this card.

 
Thanks for stopping by... hope to see you again soon.... but in the mean time be sure to stop by the STORE where these items and so many others are available. Also take note of all the products that aren't carried in our regular local stores. ... AND the service is A1. 


Amazing String Art cards at Whisker Graphics


Hi Bev here today and for this project I am experimenting with string art using Whisker Graphics divine twine. I used many layers some popped up, die cut sentiment and a great string art design.


To start this project I am taping the design to the base cardstock to be sure it fits the card base.


I used an awl to pop the holes into the paper. 


Following the #'s on the design sheet I weaved the twine up and down following the pattern.


Here is the finished design. 


Here is the finished card .... using great twine and monochromatic colours.


Here is a bonus project trying yet another string art design on a card.
Thanks for stopping by.... see you again soon.

Photobucket

Sunday, September 23, 2018

"thanks" Card


So I am playing with Digistamps4joy Sept Progressive Freebie Challenge image and I am using the Sketch n Scrap Card Sketch #130 to create my card "thanks".
I used products from The Rubber Buggy - Wild Rose Studio Butterfly Galde paper pack and matted the layers for depth and demension.


The flowers are copic coloured and popped up.

The layers are fabulous and I used white Signo gel pen to accent the copic coloured pedals and leaf.

From the side you can see the layers.
Thanks for your visit. Hope to see you again soon.

Photobucket

Monday, September 17, 2018

Cherish Always using SG Sketch and The Rubber Buggy Products


I am using The Rubber Buggy products along with the Scrapbook Generation SG Scrap Squad Friday Freebie Sketch Challenge to create this fun 1st Thanksgiving celebration dinner in our new house.


I started with the background blocks.


Then I machine stitches each and everyone of them. 


Using some of the accents of the sheets in the Collection I started the upper cluster. 


I then added the 3 photos and so many more fun clusters around the photos.


Here is the title cluster in a close up.


Another close up shot for you viewing so you don't miss any of the details... inspired by the sketch and the amazing Photoplay Freshed Picked Collection. When creating I use Beacon 3-in-1 Glue.


Thanks for joining us today. Be sure to visit the STORE to view these and so many more products.