Showing posts with label Die cuts. Show all posts

Monday, October 23, 2017

Creative Escape Papercrafting using Fall Frenzy Kit


Hi.. this is my 5th card for Creative Escape Papercrafting using the Fall Frenzy Kit. This card started by using cardstock and die cutting the base using Elizabeth Craft Designs Accordion Fancy Label Die.


Description

This kit is packed with hand-picked goodies to enable you to have a fall card making frenzy.  It’s perfect for Thanksgiving cards but also has elements that you can use all year.
The kit contains:
1 “Forest Feast” Lawn Fawn stamp set featuring 14 images and 11 words/phrases (made in the USA)
1 “So Thankful for You” Lawn Fawn die, approx. 5.75″ long (made in the USA)
1 Echo Park “A Perfect Autumn” 12×12 Double Sided Paper 3″x4″ Journaling Cards (cut into 2 pieces for shipment) (made in the USA)
1 Echo Park “A Perfect Autumn” Seasonal Stripe, approx. 12″x1.75″ (made in the USA)
12 double-sided 6″x6″ sheets of Echo Park “A Perfect Autumn” paper (made in the USA)
1 sheet of 8.5″x11″ yellow card stock
2 sheets of 8.5″x11″ kraft card stock
3 sheets of 8.5″x11″ white card stock
1 sheet of 8.5″x5.5″ copper card stock
1 sheet of 8.5″x5.5″ water color paper
1 sheet of 8.5″x5.5″ alcohol marker paper
1 Fall Frenzy sequins mix (1.5 teaspoons of sequins)
3 assorted die cut pumpkins (various sizes)
10 assorted die cut leaves (various colors and shapes)
3ft of yellow and white cord
3ft of  jute twine
3ft of natural hemp cord
1 bottle of Golden Sunset Nuvo Glitter Drops (1 fl oz)

After assembling the accordion frame card I used the smaller dies to cut the shapes from the fabulous paper available in the kit..... some with a mat layer under the cute image on paper too.


More of the work was in the base card.... then gluing all the pieces on was easy.


On the front panel I also inked and used nuvo glitter on the diamond corner accents.


On this section I add a small twine bow.


The last section was flat with layers only.


It stand restyle for your viewing of all the panels. ... isn't it cute.

So glad you could stop by today... hope to see you again .... soon.

Saturday, October 21, 2017

Creative Escape Papercrafting using Fall Frenzy Kit


Hi.. this is my 3rd card for Creative Escape Papercrafting using the Fall Frenzy Kit. For this one I am using a tri shutter fold and adding all the trim papers and accents. (I am supplying an instruction sheet for you to follow to be able to make this card too)


Description

This kit is packed with hand-picked goodies to enable you to have a fall card making frenzy.  It’s perfect for Thanksgiving cards but also has elements that you can use all year.
The kit contains:
1 “Forest Feast” Lawn Fawn stamp set featuring 14 images and 11 words/phrases (made in the USA)
1 “So Thankful for You” Lawn Fawn die, approx. 5.75″ long (made in the USA)
1 Echo Park “A Perfect Autumn” 12×12 Double Sided Paper 3″x4″ Journaling Cards (cut into 2 pieces for shipment) (made in the USA)
1 Echo Park “A Perfect Autumn” Seasonal Stripe, approx. 12″x1.75″ (made in the USA)
12 double-sided 6″x6″ sheets of Echo Park “A Perfect Autumn” paper (made in the USA)
1 sheet of 8.5″x11″ yellow card stock
2 sheets of 8.5″x11″ kraft card stock
3 sheets of 8.5″x11″ white card stock
1 sheet of 8.5″x5.5″ copper card stock
1 sheet of 8.5″x5.5″ water color paper
1 sheet of 8.5″x5.5″ alcohol marker paper
1 Fall Frenzy sequins mix (1.5 teaspoons of sequins)
3 assorted die cut pumpkins (various sizes)
10 assorted die cut leaves (various colors and shapes)
3ft of yellow and white cord
3ft of  jute twine
3ft of natural hemp cord
1 bottle of Golden Sunset Nuvo Glitter Drops (1 fl oz)
Using the supplied instruction sheet we cut, score and fold the base for our tri shutter card. Print it on 8.5" x 11" for future reference and to follow along.


Start with 5.5" x 12" 


Do all the scoring and cutting... then fold on the lines.


View from the top for easy folding.


Once you have the base you pull papers, accents and trims that you would like to use to decorate your card. .... anything goes at this point. I fussy cut the owl from paper and matted it. The kit came with some super fun leaves and pumpkins for you to use.


Start with some base prints to fit the pieces into place. 


Mix and match the prints any way you like... lots of options.


I popped dotted the owl to stand out off the front of the card.


Here is my finished card showing you all the details on all sides for your viewing.


I added nuvo glitter around the edges of the owl image.... the sparkle is perfect.


More up close shots for your viewing.


What a great die cut sentiment.


It folds down flat to put in the envelope.

So glad you could stop by today. Hope to see you again soon,

Dies R Us and my 1st DT project


Hi .. How are you today. This is my 1st DT project for Dies R Us and I am super excited to be able to share projects using some amazing products. This Smile card is the first project I want to share with you. I used a background die and the sentiment die cut. The light blue colours with white and the great bird image make for a light airy "Smile" card.

Supply List:
Machine: Big Shot Sizzix
Tool: My Sweet Petunia Misti
Paper: Blue Fern Studios Wanderlust Collection
Twine: Whisker Graphics
Stamp: 49 and Market Gabi's Square Stitch 
Ink: Tim Holtz distress Vintage Photo, Memento
Other: Beacon glue, cardstock, foam


So to start this card I gathered some papers, stamps and dies together.

                 
Using 2 different colour paper I die cut my pieces for the card.
   

With a fabulous base and print paper I then stamped a mat for the fun bird in flight using My Sweet Petunia Misti board.


I die cut the tile background and glued it to the front of panel looking blue paper. I finished with some wrapped twine and tied bow. I took the stamped outer stitch looking square which I will be pop mounting the bird paper image on the centre of.


I am pleased with the colours, layers, fabulous die cuts and the fun stamp / image centre with twine tied accent and die cut "Smile" sentiment.


Don't forget to come join in the fun at the Dies R Us Challenge Blog.  There's a new challenge theme offered on the 1st and 15th of each month and one lucky randomly drawn winner will receive a gift voucher prize to the Dies R Us Store.  For your convenience, all the important Dies R Us links are provided below.
click below for:

Thanks for visiting... hope to see you again soon, Have a great day.

Friday, October 20, 2017

Creative Escape Papercrafting using Fall Frenzy Kit


Hi.. this is my 2nd card for Creative Escape Papercrafting using the Fall Frenzy Kit. It is also an easel card showcasing lots of amazing layers, colours and accents with some cool stamping.


Description

This kit is packed with hand-picked goodies to enable you to have a fall card making frenzy.  It’s perfect for Thanksgiving cards but also has elements that you can use all year.
The kit contains:
1 “Forest Feast” Lawn Fawn stamp set featuring 14 images and 11 words/phrases (made in the USA)
1 “So Thankful for You” Lawn Fawn die, approx. 5.75″ long (made in the USA)
1 Echo Park “A Perfect Autumn” 12×12 Double Sided Paper 3″x4″ Journaling Cards (cut into 2 pieces for shipment) (made in the USA)
1 Echo Park “A Perfect Autumn” Seasonal Stripe, approx. 12″x1.75″ (made in the USA)
12 double-sided 6″x6″ sheets of Echo Park “A Perfect Autumn” paper (made in the USA)
1 sheet of 8.5″x11″ yellow card stock
2 sheets of 8.5″x11″ kraft card stock
3 sheets of 8.5″x11″ white card stock
1 sheet of 8.5″x5.5″ copper card stock
1 sheet of 8.5″x5.5″ water color paper
1 sheet of 8.5″x5.5″ alcohol marker paper
1 Fall Frenzy sequins mix (1.5 teaspoons of sequins)
3 assorted die cut pumpkins (various sizes)
10 assorted die cut leaves (various colors and shapes)
3ft of yellow and white cord
3ft of  jute twine
3ft of natural hemp cord
1 bottle of Golden Sunset Nuvo Glitter Drops (1 fl oz)

Up first I laid out on orange paper the stamp images I wanted to work with.


I used my mini misti stamping tool.


I thanks matted the main background paper. and cut some other pieces.


With pieces ready I also stamped the sentiment.


With the basics all ready I foam popped up the pendant cluster.


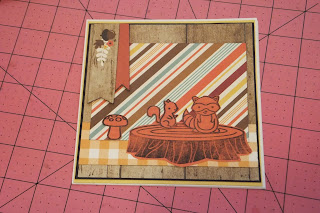
Here is the photo of my main front part of the card. 


Using my Big Shot Express I die cut the Lawn Fawn sentiment.


I shaped the card base to form the easel style. My easy method is to just fold the front panel into the centre at the half way fold. To form the front I cut an extra piece the same size as the full front panel and decorate it.


The front panel  gets glued to only the one half section of the fold.


Now on the inside I decorate the  panel with a cardstock background to start.


I then use smaller pieces to decorate the inside, add the extra stamped and matted section and through the upper section I use a border piece glued on top of all the layers to make the ledge to hold the front panel up in place.


The die cut sentiment was added to the front and the card is done.... and the easel portion of the card is perfect... Easel sections also add some extra colour and decor to a card.


Thanks for stopping by... hope to see you again soon.