Friday, November 29, 2013

Robin's Nest and tonic punch month


Welcome back to the fabulous month at Robin's Nest and the joint efforts with Tonic Studio Punches. My punch is called Simplicity Pattern Vine Strip. I am starting with a christmas page : Merry Christmas.


In this close up I started with a large circle which I marked and punched all the way around. I made sure it was bigger than the photo I wanted to centre on it. I then added a thin black border around the outer edge and then added Solid Color Dew Drops spaced between the punching.
On this page I added stickers with stickles added and punchinella under the title.


On this page: Greetings I used Robin's Nest papers and added some white ink smeared to background for effects. The trees are fussy cut along with the matted title word from Christmas Collection paper. The top portion is another paper from the collection.


In the close up you can see some of the details and also the small punched border to base the photo.


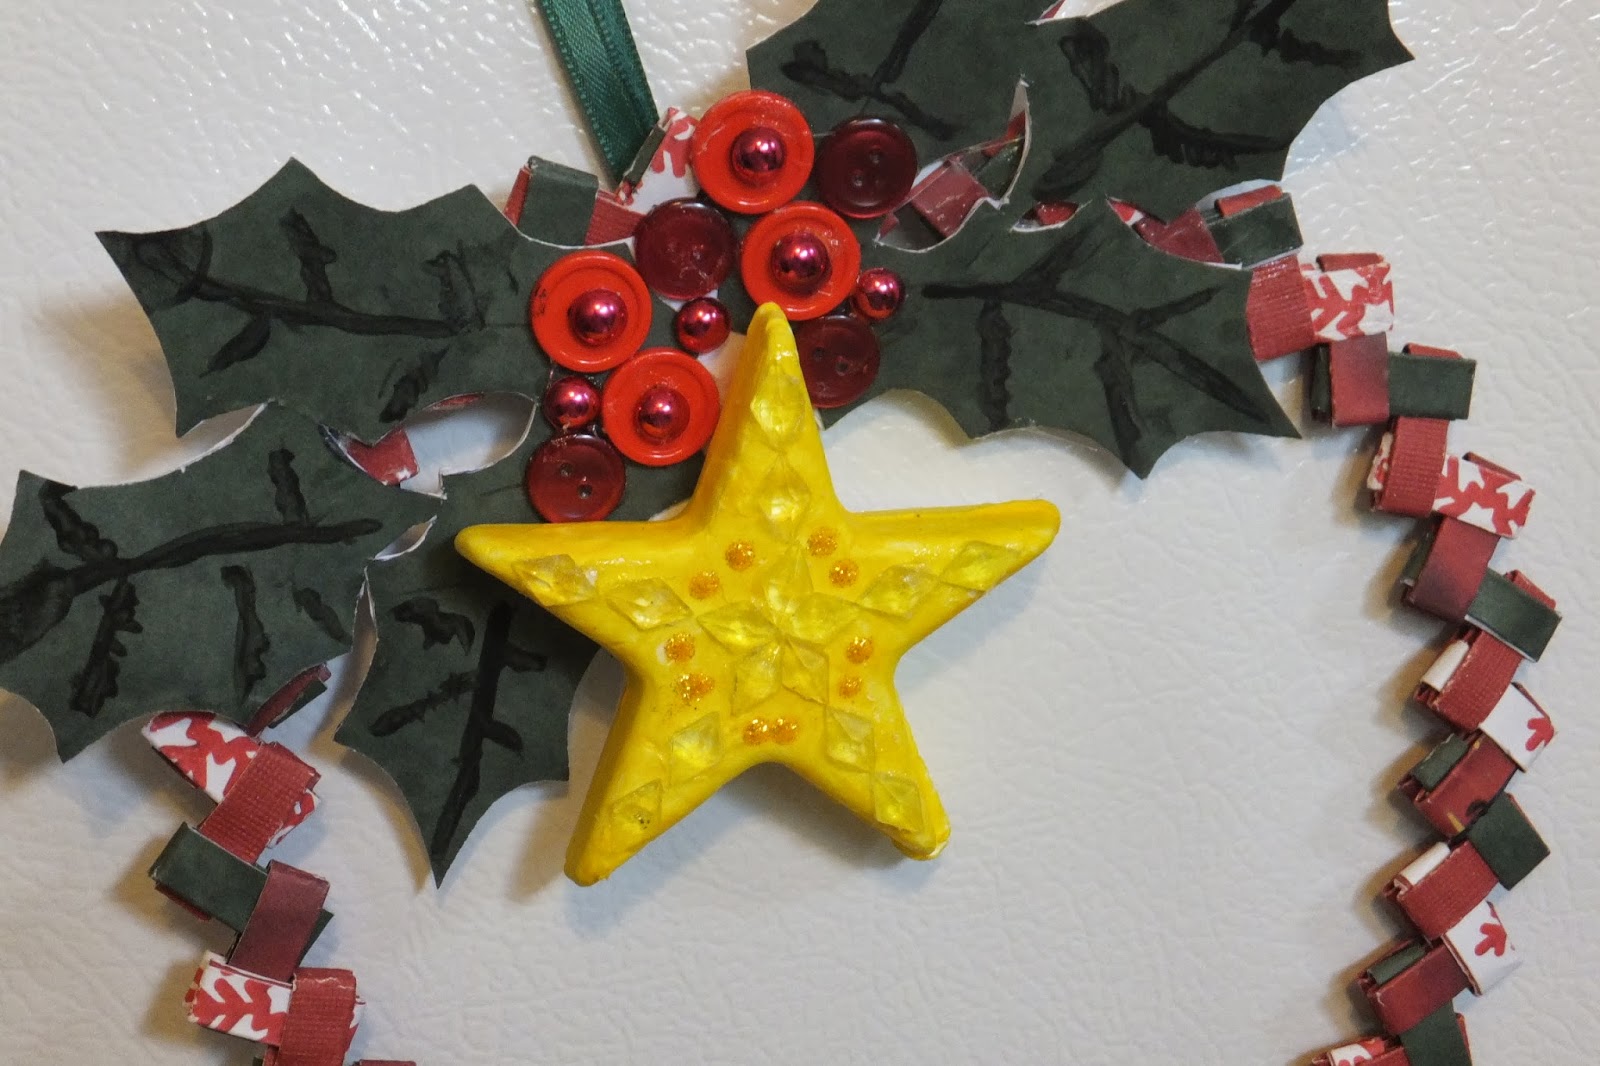
This cute card is layers or strips of scraps from the Christmas Collection..
 and some of them are border punched to shape a tree with a fabulous 
Pearl Ace of Diamond Dew Drops to form a star
 and Red Ace of Diamond Dew Drops across the bottom of tree.
*********************
I have one more card  and some tags made with scraps using the Tonic Studio punch.


Starting with a square base no bigger or wider than the finished card.. layers strip of paper punched and unpunched until you cover the base piece. When it's all covered at least the size you want your finished tree
from the back side draw the shape of the tree to be cut. Add a trunk and finish with accents. Mine are SRM stickers.


Some fun tags with I accented with Tonic Studio Punched borders.
All give you different look to them.. mix it up for fun.

**********************************


Last but not least.. here are the mini card holders with cards and envelopes the I promised you.


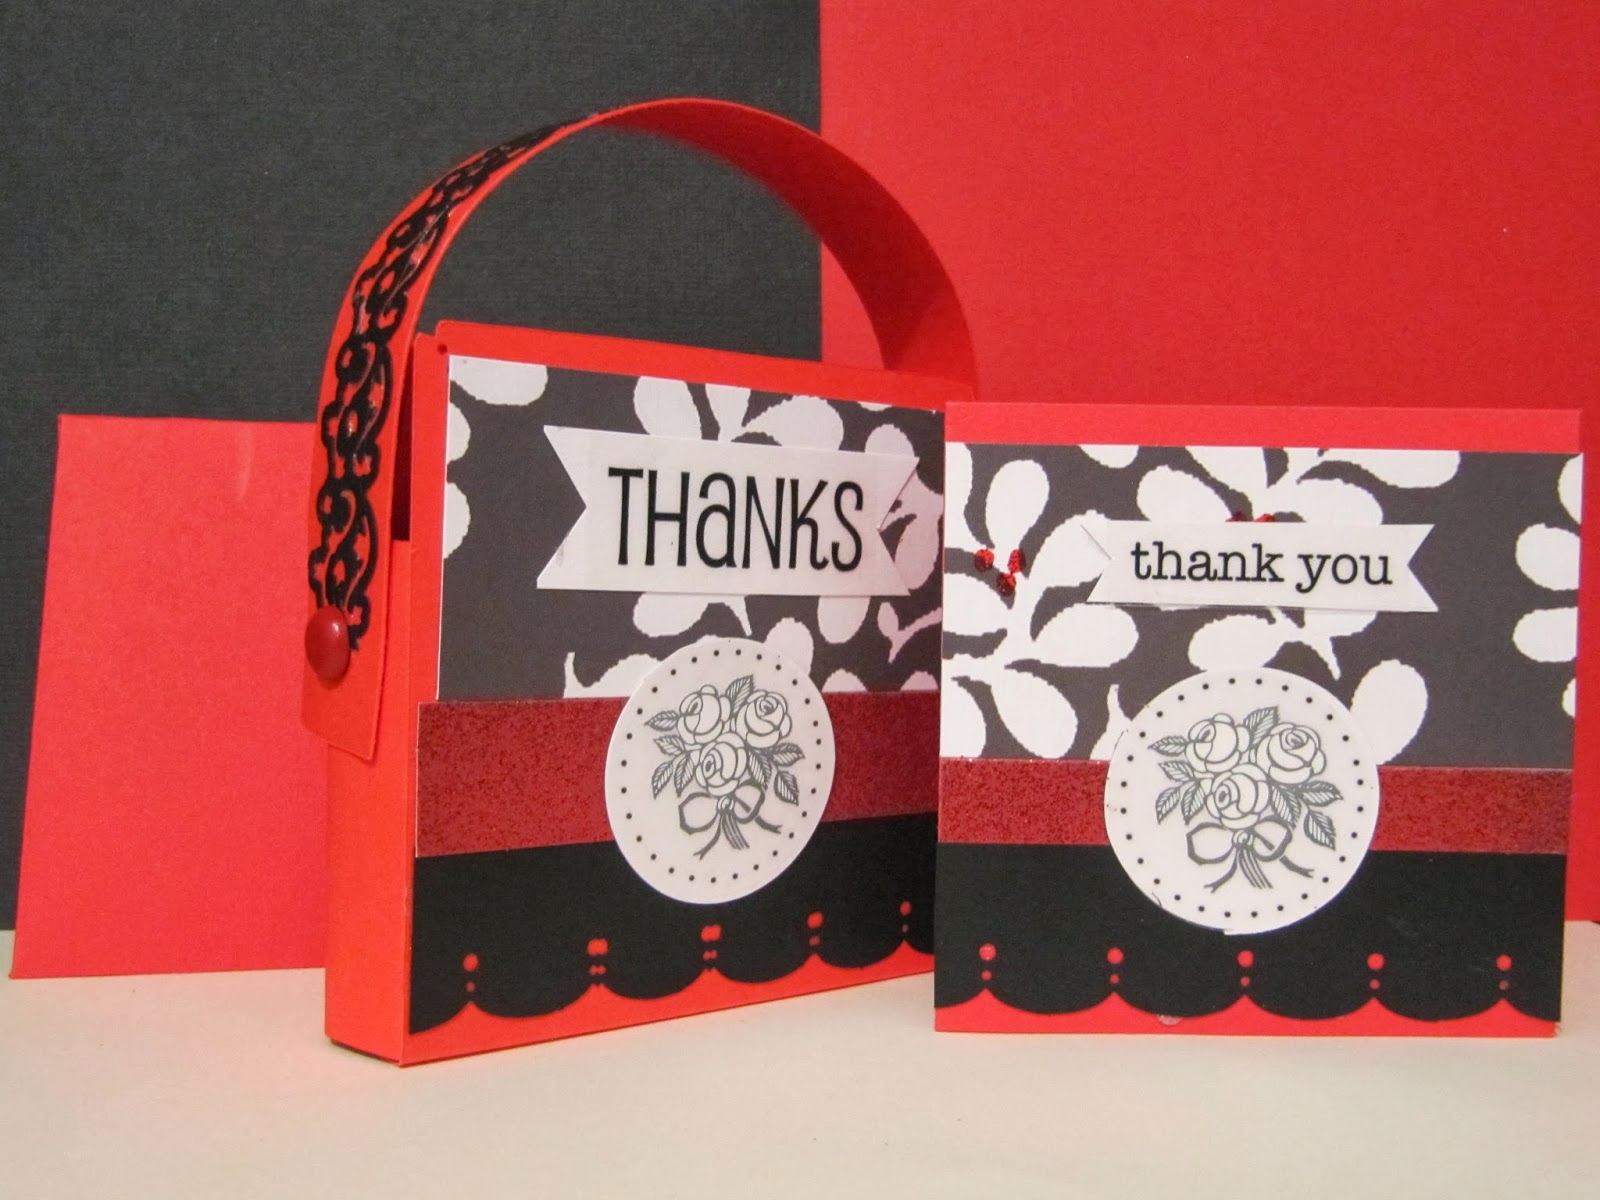
The 2 above collections are made with scraps from my monthly Christmas Collection from Robin's nest 
with some added cardstock. The sticker accents are SRM stickers
 and the fabulous handle is Tonic Studio Punched.
Each Mini holder has 6 cards and matching envelopes.

The tutorial on how to make these cool mini card holders is here: 
with Regina Andari
with some slight alterations and I added the envelopes to the set.


Supply List for the above projects:
Robin's NestPapers: Christmas Collection (North Pole)
ALL 20% OFF RIGHT NOW
Stones:Solid Color Bottles, Ace of Diamond Dew Drops
Punch: tonic studio
Stickers: SRM
Die cuts: cricut
Other:ribbon, stickles, brads, ink, Punchinella

Thanks again for visiting.. and hope you'll visit next month again when we have more
fabulous Robin's Nest products to share.

Photobucket

Monday, November 25, 2013

12 Days of Christmas Blog Mini Crop


Attention all scrappers.. need some last minute inspiration to finish some cards, tags and gifts. Be sure to mark your calendar and join us in the fun and games too.
Photobucket

Amazing month at Robin's Nest


First of all the product for the month of November was amazing. I use lots of it to share the 1st of the month
the above cards all with tutorials. This was my DT application that I submitted to
hopefully be able to return to the team for the 2nd term.

Here is the link and tutorials if your interested. 

Here is the link to the STOREChristmas CollectionClassic Glitter  SwirlDew Drops Diamond ShapesDew Drops Solidsto view many more items. 

                 ******************************

Then......... we had an amazing opportunity for a sponsored blog hop with Smoothfoam which highlighted their foam ornaments. I used some more of my November products on some of the projects.   
Here  is the link to the above projects where you can find the tutorial for the wreath  also.  
http://beeceecreativity.blogspot.com/2013/11/robins-nest-blog-hop-using-smoothfoam.html


*************************************

That was just the start to my month using Robin's Nest products.


Now the fun begins because this month because we are linking up with "tonic studios" and the their amazing punches.
My punch is called Simplicity Pattern Vine Strip.
I started with a Family xmas page:


 Lots of fun punching borders and a circular accent along with some fussy cut trees and glittered snowflakes.. and added 
Robin's Nest gem stones.


In this section you can see the details in the circular accent and border using the tonic punch... and also the Robin's Nest title using the ... alpha letters.


In this section the gem stone decorated and fussy cut tree has a great gem stone star on top too.
****** Up next is a page called "HO HO HO".


This page boasts lots of borders. Some are just strips of border patterns cut from the Robin's Nest paper, some are sparkle cut Robin's Nest paper punched with tonic punch... and some smaller thinner pieces are a group of strips that sparkle.
Also the right side of this page has many 
fussy cut sparkled trees.
The background was masked and smeared with some gesso to give more texture to the amazing tree branch paper.
The HO HO HO is cricut cut using Robin's Nest scraps and has added stickles to them.


In this close up you see the sparkle paper punched and the sparkle strip accented with white dew drops.
**********


This Happy Holiday page started with a base background piece called
Flame Glitter Swirls and then going through my stash I started cutting strips from the papers that had great lines in the design of the papers...  and some of the lined paper that was a mix of regular and sparkle lines. 
These were staggered and spaced to form the background layers. 
Photos were matted with black to pop on red... 
and some black snowflakes were cricut cut.


In this close up you see the strips and snowflakes with the added white dew drops.
*************

Last but not least is a simple but cool card.

Just lots of scraps.. layered for colour... 
then by drawing a rough tree shape on the back of the 
green paper.. using twine instead of thread.. weave back and forth forming the shape of tree... so easy.
Next and quick SRM sticker title and lots of fun coloured 
dew drops  to decorate the tree.

******************

Sure hope you enjoyed my many projects so far for the month of November using Robin's Nest products and tonic punch too.

Thanks for stopping by and be sure to visit again later this month for some more amazing fun things I will 
share with yet another tutorial for a mini card holder, 
cards and matching envelopes too.

Supply List for these projects:
Robin's Nest 
Papers: Christmas Collection (North Pole)
ALL 20% OFF RIGHT NOW
Stones:Dew Drops,Solid Color Bottles
Alpha Letters: Glitter Red Letters
Punch: tonic studio
Stickers: SRM
Die cuts: cricut
Other: twine, ribbon, stickles

Monday, November 18, 2013

Let's Get Sketchy.. full of memories


Tabitha is sharing the sketch today at Let's Get Sketchy.
I am enjoying playing with my fall family photos. 
I turned this sketch sideways to use it.. fit the larger photos better.


Close ups show some stickers, buttons and fun colours.


Small cluster to finish off the title.


Burlap ribbon has been perfect for fall colours and texture.

Be sure to stop by and see the other DT Reveal pages using this same sketch.

Photobucket

Thursday, November 14, 2013

Robin's Nest BLOG HOP using Smoothfoam


Please be sure to hop on over to the Chattering Robin's Blog and checkout everyone else's creations using Robin's Nest.   and Smoothfoam product and be sure to become a follower of each blog for a chance to win prizes...now who doesn't love prizes??? I know I do."

What is Smoothfoam?

Smoothfoam is our brand name for molded EPS or Expandable Polystyrene. It is a smooth, closed cell foam, most commonly referred to as smooth Styrofoam ®. It is molded from tiny beads into many shapes like balls, bells, eggs, miniature fruit shapes and more. Because of its smooth surface it is excellent for painting. It is also very durable, making it great for projects requiring pins or glue.

Here is my fun mix of ornaments using Smoothfoam and Robin's Nest Products. There were so many fun shapes and fun ideas to making these cute ornaments.
Starting left to right:
1. On the round ball I used sparkle Robin's Nest paper cut snowflakes, strips of paper and dew drops. Just add glue and it's done.
2. The full shaped star  was a little harder or time consuming. I ripped Robin's nest silver creme paper into small (very tiny) pieces and individually glued them on overlapping to cover the full space. When the paper was fully dried I covered with glossy accents for a shiny top coat and to help the out edges of each small piece lay flatter. On some of the outer and upper edges i added some silver stickles for glitter.
3. On the flat bell shape I added gesso with some fun lines in the texture to give some depth. I then added ink to the upper raised gesso edges, added paint to outer edges, and added stickles to the out shape of the bell. I then added Robin's Nest gem stones to decorate with co-ordinating shades of blue stones... perfect touch.
4. The candy cane shape was so easy.. just added red Robin's Nest sparkled paper stripes with glue.
5. The gingerbread boy frame i traced on Robin's Nest sparkles gold paper, added paper vest and bowtie, added gemstone face and added a few stickles accents. The outer edges and back was painted.
6. The full shaped xmas tree was first painted and streaked for depth and the lots of fun Robin's Nest glitter gem stones.. i used 3 different colours to look like decorations on the tree. Also added a few drops of stickles for flatter depth on tree.

When these were all done I remembered this vase with fun coloured sparkle paper that I had received with chocolates in it from a friend. It was the perfect mix of colours and with placement of the ornaments in it I would have a great centre piece.

I still had some ornaments left and could think of more fun ways to decorate just the ornaments so came up with what I think is a cool xmas decoration that needed that finishing touch of a smoothfoam ornament.. it was perfect.
To take the photo and have a white background I hung it on the fridge and actually it looks great there.. or hanging on the wall would be perfect too.

On this project I used Robin's Nest xmas paper collection and cut strips to make the weaved paper wreath.
When I was a kid I used to make these chains from the gum wrappers? Did you ever do this?
Here is a link on how to make the basic link paper chain....
http://www.bhg.com/christmas/crafts/folded-paper-wreath-ornament/
I traced and cut the holly greens and added some painted veins.. the berries are made up of buttons and Robin's Nest dew drops. It has a ribbon hanger.
The ornament was started with a base of yellow paint and then accented with more yellow and clear Robin's Nest gem stones... and just a touch of stickles too. It was the finishing touch to the holly clustered accent to my cute paper wreath.


And last but not least I gave the little girl next door and her mom a few ornaments to play with also... a few xmas papers and some Robin's Nest gem stones... here is what they have to share with you.
So Kids can play along making ornaments too.. they'll love it.

Be sure to check out what the rest of the DT did with these fun Smoothfoam ornaments
 and the Robin's Nest Products on their blog.

Photobucket

Wednesday, November 13, 2013

Dancing and a fun album for a friend

 Had fun cutting images with machine and titles too.

 Making pocket pages to share the program each year.


I even managed a photo on this pocket page.


Using fun colours to match the costumes and dances.


Thanks for viewing.. see you again soon.

Photobucket