Showing posts with label Memory Box. Show all posts

Monday, November 26, 2018

Sympathy Cards at The Rubber Buggy


Hi today at The Rubber Buggy I am sharing some Sympathy cards. There are some fabulous dies out there that help make sympathy cards soft, elegant but send the reciever some heart felt wishes during this trying time.

Supply List:
Dies:  tutti 267 Fluttering Butterflies,   Tutti word set Sympathy, Memory Box 99735 Butterfly Spectacle (out of stock) 
Ink: Tim Holtz Vintage Photo
Stamping tool: Sweet Petunia mini Misti,
Machine/ tools: Vagabond
Other: Cardstock, papers from my stash

For stamping I use Mini Misti and Tim Holz Distress inks. My favourite glue is beacon 3-in-1 for small and large pieces. (there is a nack to drawing a fine line with this glue .. practice makes it easier so keep trying) 
When doing these type of cards pick soft colours, use some layers, pick soft accents (flowers, butterflies, birds etc) and keep them simple and elegant. 


Thanks for stopping by... hope to see you again soon.... but in the mean time be sure to stop by the STORE where these items and so many others are available. Also take note of all the products that aren't carried in our regular local stores. ... AND the service is A1. 


Tuesday, November 6, 2018

Christmas Card using lots of dies


Hi .. How are you today. This DT project for Dies R Us showcases a Christmas card made using lots of layered Memory Box die cuts,Trimcraft die,  along with Scraperfect Best Glue Ever with the non clog writing tip. I love the layers that the landscape with snow and trees make.... popping them with a touch of inking on the edges.

Supply List:
Ink: Tim Holtz Vintage Photo
Machine/ tools: Vagabond, Tim Holtz Stamp Platform
Other: Cardstock, twine, glitter paper,


In the closeups you can view more of the details To start I did a matted layered background. I die cut lots of white layers of the scenery ovals, the village houses in sparkle and white, and the sentiment in sparkle also.

Start by gluing the 2 landscapes together after inking the snow borders.

Slide in the houses with snow on the roofs.

Twine wrap and tie a bow... and add the sparkle Sentiment.

Look at the great layers with depth and demension.


Don't forget to come join in the fun at the Dies R Us Challenge Blog.  There's a new challenge theme offered on the 1st and 15th of each month and one lucky randomly drawn winner will receive a gift voucher prize to the Dies R Us Store.  For your convenience, all the important Dies R Us links are provided below.
click below for:

Thanks for visiting... hope to see you again soon, Have a great day.

Saturday, October 20, 2018

Memory Box 2nd Christmas card from Crafter's Castle Challenges Sponsor

Today is my blog post for Crafter's Castle Challenges. There will be 1 monthly challenge for you to play along with. I will be posting on the 1st and on the 3rd Saturday of the month we will recap and share another project using another product from our sponsor to inspire you. Please mark your calendars and be sure to visit the Crafter's Castle Challenge blog for details and be inspired by the DT inspired projects too.

Sponsor: Memory Box
Prize: It is the Delicate Pine Frame die 94031. Retail value is $21 Theme: Anything Goes - Winter/Christmas I invite you to visit Crafter’s Castle Blog and enter this month’s Challenge at: http://crafterscastle.blogspot.com/ Please visit this month’s sponsor, Memory Box
http://www.memoryboxco.com/

Products used in today’s project:


I did a video to share some details of my super fun Christmas card with lots of die cut layers, super cute small snowy winter village houses and trees..... along with some cute simple stamped sentiments for outside and inside my card

Hope you'll take time to view the video. Then please play along with our challenge this month so we can visit and make comments on your projects too.
Link to YouTube video is HERE

Thank you for watching. I invite you to visit Crafter’s Castle Blog and enter this month’s Challenge at Crafter’s Castle Blog to view all there amazing projects.

DT Blog Links

DT Blog Links
Thanks for stopping by.... and hope to see you play along and inspire us too.

Saturday, October 6, 2018

Memory Box October Crafter's Castle Challenge Sponsor

Today is my blog post for Crafter's Castle Challenges. There will be 1 monthly challenge for you to play along with. I will be posting on the 1st and on the 3rd Saturday of the month we will recap and share another project using another product from our sponsor to inspire you. Please mark your calendars and be sure to visit the Crafter's Castle Challenge blog for details and be inspired by the DT inspired projects too.
Sponsor: Memory Box Inc. Prize: It is the Delicate Pine Frame die 94031. Retail value is $21 Theme: Anything Goes - Winter/Christmas I invite you to visit Crafter’s Castle Blog and enter this month’s Challenge at: http://crafterscastle.blogspot.com/ Please visit this month’s sponsor, Memory Box http://www.memoryboxco.com/
Products used in today’s project:
I did a VIDEO to share some details of my super fun Christmas card with lots of die cut layers, super cute small snowy winter village houses and trees..... along with some cute simple stamped sentiments for outside and inside my card

Hope you'll take time to view the video. Then please play along with our challenge this month so we can visit and make comments on your projects too.
Link to YouTube video is HERE

Thank you for watching. I invite you to visit Crafter’s Castle Blog and enter this month’s Challenge at Crafter’s Castle Blog to view all there amazing projects.

DT Blog Links

DT Blog Links
TThanks for stopping by.... and hope to see you play along and inspire us too.

Saturday, May 19, 2018

Thank You Card at Dies R Us


Hi .. How are you today? This DT project for Dies R Us showcases an Easel style Thank You card made using some die cuts, super fun layers for depth and dimension along with Scraperfect Best Glue Ever and Vintage Photo inking on all the edges.. 

Supply List:
Glue: ScraPerfect Best Ever Glue
Ink: Tim Holtz Vintage Photo
Machine/ tools: Big Shot Express,
Other: Cardstock, Echo Park Alice in Wonderland, metal brad


To start you make you base for standard card of use ready made from store. The front cover of base card is then folded in half as per above. We will then cut another cardstock single base the size of the card to work on.


So using the single base cardstock you cut you pull paper and die cuts you hope to use and star cutting them. I chose a forest green background... then cut the white border edge. I pulled the floral print and used the die to cut just the border edge to match the white border where it would fit.


Here is the layers all assembled.


I then using a centre forest green border to help pop the white sentiment "Thank You".


On the inside of card I backed with forest green, added the floral print and die cut another white die cut border.


I added an extra thin strip to separate the floral from the white.


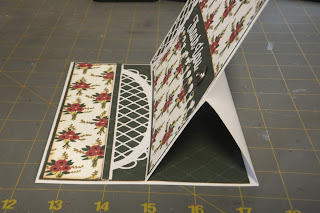
From the side now you can see the folded front cover waiting for the single white piece that we totally finished to add to it. You only add glue to the half fold and place the front single accented piece matching up the edges and keeping things straight.


The lip of the scalloped border will serve and the stopping edge to make your card stand up.
When placing into the envelope just fold it down flat and your done.


Don't forget to come join in the fun at the Dies R Us Challenge Blog.  There's a new challenge theme offered on the 1st and 15th of each month and one lucky randomly drawn winner will receive a gift voucher prize to the Dies R Us Store.  For your convenience, all the important Dies R Us links are provided below.
click below for:

Thanks for visiting... hope to see you again soon, Have a great day.

Saturday, April 28, 2018

Dies R Us shares a "Happy Father's Day" card


Hi .. How are you today. This DT project for Dies R Us showcases a Father's Day card made using some die cuts and super fun layers for depth and dimension along with Scraperfect Best Glue Ever and Vintage Photo inking onall the edges.. 

Supply List:
Glue: ScraPerfect Best Ever Glue
Ink: Tim Holtz Vintage Photo
Machine/ tools: Big Shot Express, Misti
Other: Cardstock,


This is a super fun and easy card. I grabbed nautical paper, die cut the sentiment and accent and pulled buttons from my stash. 


Be sure to ink all the edges for contrast and depth. I matted with cardstock and glued to the card base.


In the close up you get a better view of the die cuts.


Don't forget to come join in the fun at the Dies R Us Challenge Blog.  There's a new challenge theme offered on the 1st and 15th of each month and one lucky randomly drawn winner will receive a gift voucher prize to the Dies R Us Store.  For your convenience, all the important Dies R Us links are provided below.
click below for:

Thanks for visiting... hope to see you again soon, Have a great day.