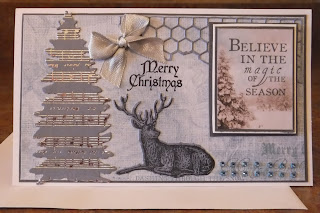
hi... so hope you had a great weekend and adjusted to the time change? This fun card is a gift card holder and I am sharing the details on how to make it. I used just the tree die and stamped and die cut the deer image along with mix and match papers for the kit. I am still using the Christmas Kit fully loaded from Creative Escape Papercrafting. Each card is different and I will do individual blog posts sharing the how to info so you can make them too. Be sure to visit daily when I do another one.
We all can use gift card holders for Christmas and many other occasions throughout the year ... and this one is an easy style everyone can make.

Kit lives up to its name. It starts with a set of 6 stamps with 4
matching dies. There are 18 sheets of 6.5″ x 6.5″ specialty paper (some
of which are foiled). It comes with a full 8.5″ x 11″ sheet of acetate and
0.5 oz of Lawn Fawn chunky glitter – a perfect combination for shaker
cards! There’s also a bottle of Liquid Mercury Nuvo drops and a bunch of
other goodies to give you an abundance of card making options.
1 0.5 oz jar of Lawn Fawn chunky glitter
1 Bottle of Nuvo Liquid Mercury Crystal Drops (1 fl oz)
18 Sheets of 6.5″ x 6.5″ specialty paper from the Kaisercraft “Frosted” collection
1 12″ x 12″ cut apart sheet from the Kaisercraft “Frosted” collection
1 Bottle of Ranger Glossy Accents (0.5 fl oz)
1 Sheet of 8.5″ x 11″ acetate
3 Sheets of 8.5″ x 11″ white card stock
1 Sheet of 8.5″ x 11″ light gray card stock
1 Sheet of 8.5″ x 11″ navy blue card stock
1 Sheet of 8.5″ x 11″ powder blue card stock
1 Sequins mix featuring Studio Katia (approx. 1.5 tsp)
1 Snowflake/gem mix featuring Studia Katia gems
1.5 yards of purple sheer ribbon
1.5 yards of blue sheer ribbon
1.5 yards of silver/gray ribbon
1.5 yards of gold twine
40 Blue 3 mm adhesive gems
24 Clear 6 mm adhesive gems
9 mini wooden embellishments
1 assorted ephemera pack (contents may vary)
*Note: 12″ x 12″ sheet is cut into separate pieces for shipment
So to make this easy... take a premade card base (or make your own.) At the bottom back side at about 1/2" fold up for a pouch/ pocket to hold the gift card. Close the front of the card and carefully cut off the excess to accommodate where our fold was.
Now I am using blue print paper so I have texture and stamping the deer.
I then die cut out the deer.
I now took a few other prints from kit to make the lighter background base. I die cut out the tree using the paper with some glitter on it. Using another accent die I cut the corner accent piece. From the kit I also hand cut and matted the sentiment image title. With this kit you have so many possibilities to mix and match chose your own pieces that jump out at you.
I tied a small bow using ribbon from the kit.
On this photo I now sharing my proposed layout of the pieces.
Now removing them I start gluing from the bottom moving forward to the front.
I decided to stamp the sentiment.... in the open space.
The card is all back together again.. and I added some of the gem stones from the kit.
In the close ups you can see the details better and the papers too.
Using print blue paper and then stamping it give some cool looking texture to the deer.
Adding layers of matting to the image/ words add great depth and colours.
Inside the panel I glued the side ends closed to hold the pocket firm to secure the gift card.
I also added a stamped sentiment to inside the card and added a matted border for trim.
Here is the link to the Christmas Kit fully loaded from Creative Escape Papercrafting and the STORE where this and many other products are available.
.


1 comment:
Bev you have an awesome imagination to come up with these ideas for cards. This one is fabulous!
Post a Comment