Tuesday, May 27, 2014

Friends Card and Kreaxions punch

DSCF8919 r
Hi Bev here today .. and welcome to Just Imagine Crafts ...there isn't a day goes 
by that I don't forget what a friend means to our lives.
This card is perfect for any occasion that you want to tell a friend that they mean so much to you too.
I actually started this card with the friends sentiment and the chipboard.
From there was the background and now it needed some pop.. what better than a punched border using Kreaxions punch #310 and also the fall away piece... so one on the top and bottom of the card.
In the middle you find the ripped and inked matted background, the fabulous sentiment and some fun chipboard accented with stickles and liquid pearls.
It was still missing something.. and what better than some added twine.
310
Stop by the store and see all the other amazing punches and products there are.
Thanks for stopping by and hope to see you again soon.
Photobucket

Linnie Blooms and making your own leaves


Hi Bev Code here today at Linnie Blooms Design.. so glad to be sharing this today.
Starting with the Canvas Floral Shapes I inked and multi sprayed for colour.


Now I hand stitched the centre pulling it together to give it some 
texture looking waves to look more natural.
Then glue them on top of each other.


Now I will share how to make your very own leaves and all you need is green cardstock.
Follow the instructions above to make as many as you need.


I started the card with a boughten base and heidi grace designs paper.
I used my Kreaxions Punches #303 and #903 with insert to make my borders and then
matted them with cardstock to pop the punched borders. 
I also added SRM sticker stitches to the borders.
Now following one of my very own sketches to make this card. (see below) I started
to form the centre - 2 squares with inked edges and a
 SRM floral sticker and then the main centre piece.
Here I used the Linnie Blooms burlap, added more layers to
 my flower from above and added the homemade leaves.
To finish it off I made a multi layers sentiment that started with SRM Sticker.


Thanks for stopping by.. so glad to share 2 ideas ... how to create a fabulous flower from 
the great floral canvas pieces and also how to make your very own leaves.
Be sure to try these yourself... and have fun creating.

Supply List:
Paper: heidi grace design - daydream
Card base and Cardstock: misc
Punches: Kreaxions #303, #903
Stickers: SRM Stickers
Burlap: Linnie Blooms
Canvas Floral: Linnie Blooms
Ink: Tim Holtz Ranger
Other: button

Photobucket

Monday, May 26, 2014

SRM 2015 Calendar


Making a year calendar is so much easier to create when you start with the fabulous
premade SRM calendar base. Blank starter pages make it so easy for you to
 add months and dates that go with the days of the week.


I used a TCW template to paint on some clocks on the front page.


Then using SRM stickers I added a few different ones to decorate the cover.


Each month has lots of SRM stickers starting with 
the month along with a few extras.
Each page has a great  photo with even more
SRM stickers to celebrate the month.


Some of the months has SRM stickers that suit the specific
date and celebration... 14th  heart is perfect for Valentines Day.


As you want to add more celebrations to calendar you 
can add even more stickers.


Many months have special occasions besides just Birthdays.


Be sure to check each month for some ideas to decorate your own calendar.


Birthdays are hand written in.. and maybe even their age.


The stickers come in sheets to celebrate lots of themes for the year.


Some great theme stickers were perfect addition to the photo part of the calendar.


In the page above .. I used the fun SRM tags as an accent.


Some themes you would love are Easter, Halloween, Christmas to mention only a few.


And don't forget Autumn, Spring and Winter themes.


Sure had a great time creating this calendar and am thrilled to share with you.
Check out the SRM store for all the possibilities... and take note of some of the other 
amazing products that they carry too: Tubes, pillow boxes, doilys, bags, vinyl, .. and so much more.
Photobucket

Robin's Nest .. fabulous box and cards.. what a great gift


At Robin's Nest I am using their products to make this fun box using 
our co sponsor for the month.


Here is the front of my box.. see more details below.


Side view of slightly open box... all trimmed.

 Supply List: 
Robin's Nest Products:
Daisy paper
Khaki Green Glitter Letters
Other: Starform stickers, misc cardstock, P-touch title

Now I'll share the cards I made to go into the box.. for a great gift.


Supply List:
 Robin's Nest Products:
Chocolate Brown Classic Glitter Swirl
Nature Stickers
Other: punchinella, cork, stitching, twine, burlap

Supply List:
Robin's Nest Products:
Other: Punchinella, stitching, washi tape


Supply List:
Robin's Nest Products: 
Other: base card, embossing folder, ink, staedtler black pen, twine


Here is the finished box with the cards and envelopes inside. 
Be sure to stop by the Robin's Nest Blog daily to view amazing creations by all the DT. 


Photobucket

Thursday, May 22, 2014

Beautiful Card


Fabulous fun colour combo using Paper House Night Out Paper Pad today 
with some added accents does make a card
"Beautiful".

Just Imagine Crafts/Kreaxions has a punch for any project.
On this one I used the Kreaxions Circle Cutter to start the centre circle then using
the stencil marking punched upside down so I could position the punch to the edge of circle.

Added fun matting layers, centre image accent and matching sentiment along with
some Creative Embellishments, stickles and a doodled stitch line.


Kreaxions Circle Cutter to 10 inch$10.99
Kreaxions Circle Cutter to 10 inch
Click to enlarge
The circle cutter is easy to use. You turn the paper instead of the cutter. For cutting circles from photographs, there is a small white disk in the handle. Put the point on it and turn the photograph, not the cutter. These are available in inches only now..we no longer make the cm version..don't forget your spare blades!
Supply List:
Paper: Paper House Night Out paper pad PP-0802
Cardstock: misc
Punch: Kreaxions #303
Accents: Creative Embellishments, Little Yellow Bicycle sticker
Pen: Staedtler black
Ink: Tim Holtz Ranger
Stickles: Ranger

Photobucket

Tuesday, May 20, 2014

Linnie Bloom and "Amazing" page


This is my 2nd post this month revealing for Linnie Bloom products.
This "Amazing" layout boasts the canvas shapes. 
I used the bird and the banner pieces which I used misting and paint dauber on to colour them.
Also behind the title I used the burlap.

In the close ups below you can view the details.


Supply List: 

Paper: Paper House Gengerations Paper Pix, Paper House Garden Paper Pix

Stickers: Paper House Background Birds 3D -STDM -0157, Gerbera Daisies 3D - STDM 0121

Sketch: SG Debbie Sanders 

Stickers: SRM Stitches 

Ink: Tim Holtz Ranger
Accents: Linnie Bloom Collection -Burlap, and Jars of Dies -Flutter Bird Canvas and Shapes including the triangles,Creative Embellishments,Dew Drops: Robin's Nest
Other: mist, paint


Be sure to head over to the Linnie Blooms online STORE so you can pick up some of these FAB canvas pieces for yourself. 

Photobucket

Monday, May 19, 2014

Scrappin' Madges Embellishment Kits.. amazing


Welcome to our monthly reveal of Scrappin' Madges Embellishment Kit.
Above is a fabulous mix of embellishments and below is the cards I made using them.
With such a great mix it is so easy to create.


This card has a post card matted, a stamped sentiment, fun washi tape,
 twine, brads and an added metal accent.


This fun card boasts the another post card base matted, added some fun washi tape, stickers, candi mini dots, fab stamped sentiment, with some additional corrugated accent, stick pin, creative embellishment hearts border and scalloped border.


This last card using the post card matted again, washi tape, matted sentiment, 
candi mini dots, twine, stick pin and tag with a brad.

I love that the kits come with so many pieces that can be altered to make a fun mix of cards.. each one different and unique in it's own way.
Be sure to check out every months kits.... and see too what the other DT create with the same kit...

Photobucket

Paper House - May is Travel month and Xyron cross promo


Be sure to follow the 5 Day Tour started daily at Paper House
There will be prizes from Paper House and also from Xyron as well. 


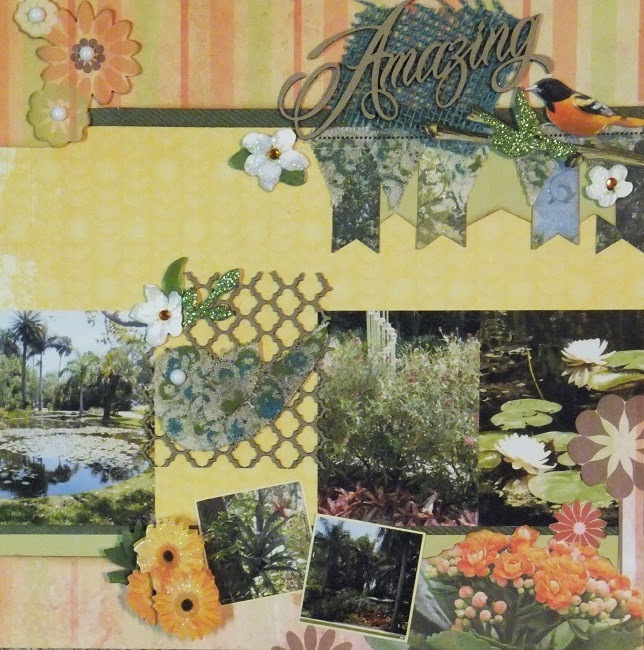
We are celebrating Travel this month with Paper House.. so I chose this
amazing fun beach page which has fab photos of our beach day in Florida when
 Stacey and girls traveled from Alabama to spend time with Kenny and I.
 I made mixing up lots of fabulous beach  themed papers and accents from Paper House.
I used a base full page but then used another paper sot fussy cut the palm trees and the great wave base.
We are doing an amazing cross promo with Xyron.


Be sure to check out the wide range of beach and summer papers and accents.


I used the papers from the 2nd row above.
Now for some details of the page with close up views.


I started with yet another paper with amazing sunny orange transition of colours to make my sun rays.
I spanned them over the page from the fussy cut palm trees.
A variety of accents from different kits came together in a fun cluster 
that I added some dew drops to.
Twine follows the title cluster making it's way down to the Creative Embellishments accent.


This section shows the fabulous base of waves. .. with some fun dew drops as accents.
It also shows some added brads, shell sticker and some journal tags which were adhered to page
using our cross promo sponsor Xyron.


Here is another view with more Shell accents from the kits.
Accents are from the Beach Collection as shown  below.


I also made the card below using the blues with a touch of yellow from the beach papers.
I used a base cardstock position the many circles on to.
My card base is 5x7" and the circles panel is about 2" wide.
Then I estimated the size of 3 circles it would take to accommodate the 2" panel.
I then cut circles (est. about 1 1/4")  and lots or them.. using the shades of blue and yellow.
I started at the bottom and worked my way up to the top.
As you should notice the 2 outer ones were glued first and
then slightly higher you glue the centre one in last on each row.
Continue to the top.. then turning to the back side trim off the 
overflow on the edges. Then I mounted it again on navy cardstock just 
a tad wider then the original panel for a finished matting 


These fun circles were cut using Kreaxions Circle Cutter and used the 


Thanks for visiting.. be sure to come often as I share even more using my 
Paper House Products.

Photobucket