Monday, December 31, 2018

Special Day using Mintay Secret Place Collection from The Rubber Buggy


Welcome to The Rubber Buggy today. It's Bev and I am thrilled to share my newest collection with you. It's Mintay Secret Place Collection. Includes 12 - double sided 12x12 scrapbooking paper (2 each of 6 papers) and 1 bonus element image sheet on back of cover.

Everyone has their own secret place, where they feel safe and where they can dream and feel free. You will find our secret place right next to the forest, full of ferns and beautiful flowers as well as mysterious, old doors. This very feminine, romantic collection is based on a very trendy color combo: emerald and antique pink. Perfect for any occasion and for any type of paper creativity.

I have been creating page with no photos to be added later and also using lots of sketches for inspiration. On this page I use amazing prints, layers in the background and super fun clusters using the accent sheets from the collection

The Rubber Buggy Supply List:

Paper: Mintay Secret Place Collection
Glue: Beacon 3-in-1,  


And here is a VIDEO revealing the collection: 


Here is a few views of this page process for creating. Start with full background sheet and cut the main front print.

This page sketch called for background strips of paper. I did lots of inking.

I then wanted to use lots of the fab images on the element sheets and love making clusters.

Here is the other cluster above the empty spots for photos to be added.


Thanks for stopping by... hope to see you again soon.... but in the mean time be sure to stop by the STORE where these items and so many others are available. Also take note of all the products that aren't carried in our regular local stores. ... AND the service is A1. 

Friday, December 28, 2018

It looks alot like Chrstmas at Whisker Graphics


OMG I am having great fun using Whisker Graphics.twine, tags and metal rimmed circle tags on my Christmas projects.  Using twine on these projects is a fabulous way to decorate. Whisker Graphics has an amazing collection of twine and tags to choose from. The project above is a special style twine border. (details below).

For the first project I started with a card base, coloured digi image and will make the twine border first.
Starting on the lower edge of front print wrap many times around.

 
Tie off the front in the centre pulling things tight and tie a knot.

Add the large size button and tie a knot and finish with a tiny bow. 

Up close of the finished twine and button border.

Add the image, brad trees, the ribbon and stamp the word christmas.

*****************************************


Up next is all these super fun and cute little gift boxes. I used the Heartfelt Creations box die cut. After die cutting from fabulous fun print papers I glued the box pieces together.


Now the trimming starts. I am using the metal rimmed circle tags and stamping them with a fun xmas stamped image... different ones and different colours.

Now I stamped the small tags with different images and different colours.

Here is a photo of the 2 tags all stamped up ready to add to the boxes.
Each box is trimmed and tied up with twine... and the 2 tags are tied and accented with twine also.


These 2 view above showcase the finsihed boxes.... all done.

***********************************


Up last but not least is a few fun cards... all finished off with wrapped twine or a tied bow.


Supply List:
Whisker Graphics: Divine Twine Small Tags,  Metal Rimmed Circle Tags
Other: Print paper, stickers, accents, cardstock, brads, button, DS4J digi image, copic colourd, Stickles, stamping, ink, Heartfelt Creations box die.

Check out the store for all the available products that will make your crafting so much easier and view the blog often to be inspired with all the creative inspiration.

Thanks for stopping by and hope to see you again soon when I come back with so many more projects using Whisker Graphics products. 

Thursday, December 27, 2018

Ann Butler Design - Amazing Inks for Stamping

Amazing Ink Makes Stamping so much easier...fun techniques


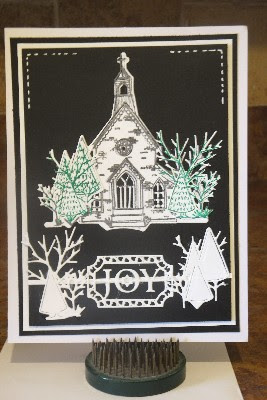
I Created these super Christmas cards using Stamp/die sets and the best ever Inks by Ann Butler. I experimented with the stamp die sets to create the layers and scenes.... and using fabulous inks with such amazing colour made them look perfect.

I would like to share some fun techniques I used to create these 2 cards. When you have coordinating stamp/die sets of the same images it allows you to be a bit more creative with the layers. I will tell you in detail what I did on each card.

Here are a few close views to showcase some details.

Step 1:

This photo shows black stamping just the church.


Step 2:

The image is then die cut in machine.

Step 3:

I then switched out the ink to the fabulous evergreen for the 2 trees.


Step 4:

The images are then all die cut in the machine to create the full scene on this one. So black church in the background and the 2 side trees have black in back and green to the front for demension. More plain unstamped trees cut and a sentiment and added to the bottom of the card.


*************************************


Here is the 2nd card with some details.


Step 1:

For this card I stamped on the actual card base with only the 2 trees in black leaving room between the trees to locate the stamped and die cut church.


Step 2:

I also allowed room to stamp the sentiment on the lower edge of the card base.


Step 3:

I then stamped lots of evergreen  tree groupings for accents. I placed the church slightly lower than the black trees. I added some green trees directly over the original ones.


Step 4:

I then added one more green tree to right side to even out the sides and fullness. It looked very plain on the out edges so I made a cardstock outer thin frame to pull it together. Using black pen I doodled some stitches in upper corners and drew a straight link to base the sentiment.


Step 5:

You can then stamp inside using your own verses or be sure to check out the newest digital sentiments from Ann's Store. 


Step 5:

I added one of Ann's verses to the 2nd card. I printed them all ... cut them apart. I matted it with black cardstock and glued it to the inside of card.


Ann Butler Designs Products used:

  • Card base/ envelope
  • Tattered Lace Church Die set
  • Trimcraft Sentiments Dies 
  • White gel pen and Micron black pen
  • Beacon 3-in-1 glue

Tools:

  • Tim Holtz Stamping Platform
  • Tim Holtz Vagabond die cut machine
  • Tim Holtz mini Tool Set
  • Fiskars Trimmer


Tuesday, December 25, 2018

Stunning Christmas Cards at Dies R Us


Hi .. How are you today. This DT project for Dies R Us showcases some very fussy die cut Christmas cards made using Scraperfect Best Glue Ever with the non clog writing tip. They are really easier to make than they look. The dies are so detailed and stunning.... Your going to love these 2 dies for sure.

Supply List:
Ink: Tim Holtz Vintage Photo
Machine/ tools: Big Shot Express, Misti
Paper: Pion Design- Gramma's Attic - Christmas Joy paper,
Other: Cardstock, accents

Using the fabulous stunning fussy dies... .I cut them in black.

I used white cardstock matted with black card stock to base the amazing design.

I put the Pion image into the diamond shape ... it was perfect.
The other card was easy.. just circle cut the image to fit the circular section of yet another amazing stunning die cut.


Don't forget to come join in the fun at the Dies R Us Challenge Blog.  There's a new challenge theme offered on the 1st and 15th of each month and one lucky randomly drawn winner will receive a gift voucher prize to the Dies R Us Store.  For your convenience, all the important Dies R Us links are provided below.
click below for:

Thanks for visiting... hope to see you again soon, Have a great day.