Friday, September 30, 2016

C87 Journey in Time Collection Happy Snaps for Fab Scraps


Hi everyone.... hope your all doing fine. Today I am sharing a Year end Show page for my friends daughters dance group. I enjoy putting her albums together every year as my Grand Daughters are not into dance for years now. Totally love the change to use fun colours to match the uniforms and a change up of accents too.

FOR THIS LAYOUT YOU WILL NEED:
Supply List:
Fab Scraps Products:
Paper: C87 Journey in Time Collection
Chipboard: DC87 003 Happy Snapo
Die Cuts: MC87 001 
Stencil: DS 054 Postage Stamps and numbers
Sticker: ST87 001 Postage Stamp
Ink: Tim Holtz mini
Die: Spellbinder, Memory Box
Accents: Stickles
Sketch: Oct Creative Inspiration
Other: brad, micron black pen, alpha, ribbon

I also used a sketch from Creative Inspiration.


INSTRUCTIONS:
STEP #1: First thing I do is pull papers that mix and match, cut some into different sizes or shapes for layers ( this one I followed the sketch above for a start to the background and turned it sideways). I lay the photos on, pick and or make some accents that will work with the the photos.


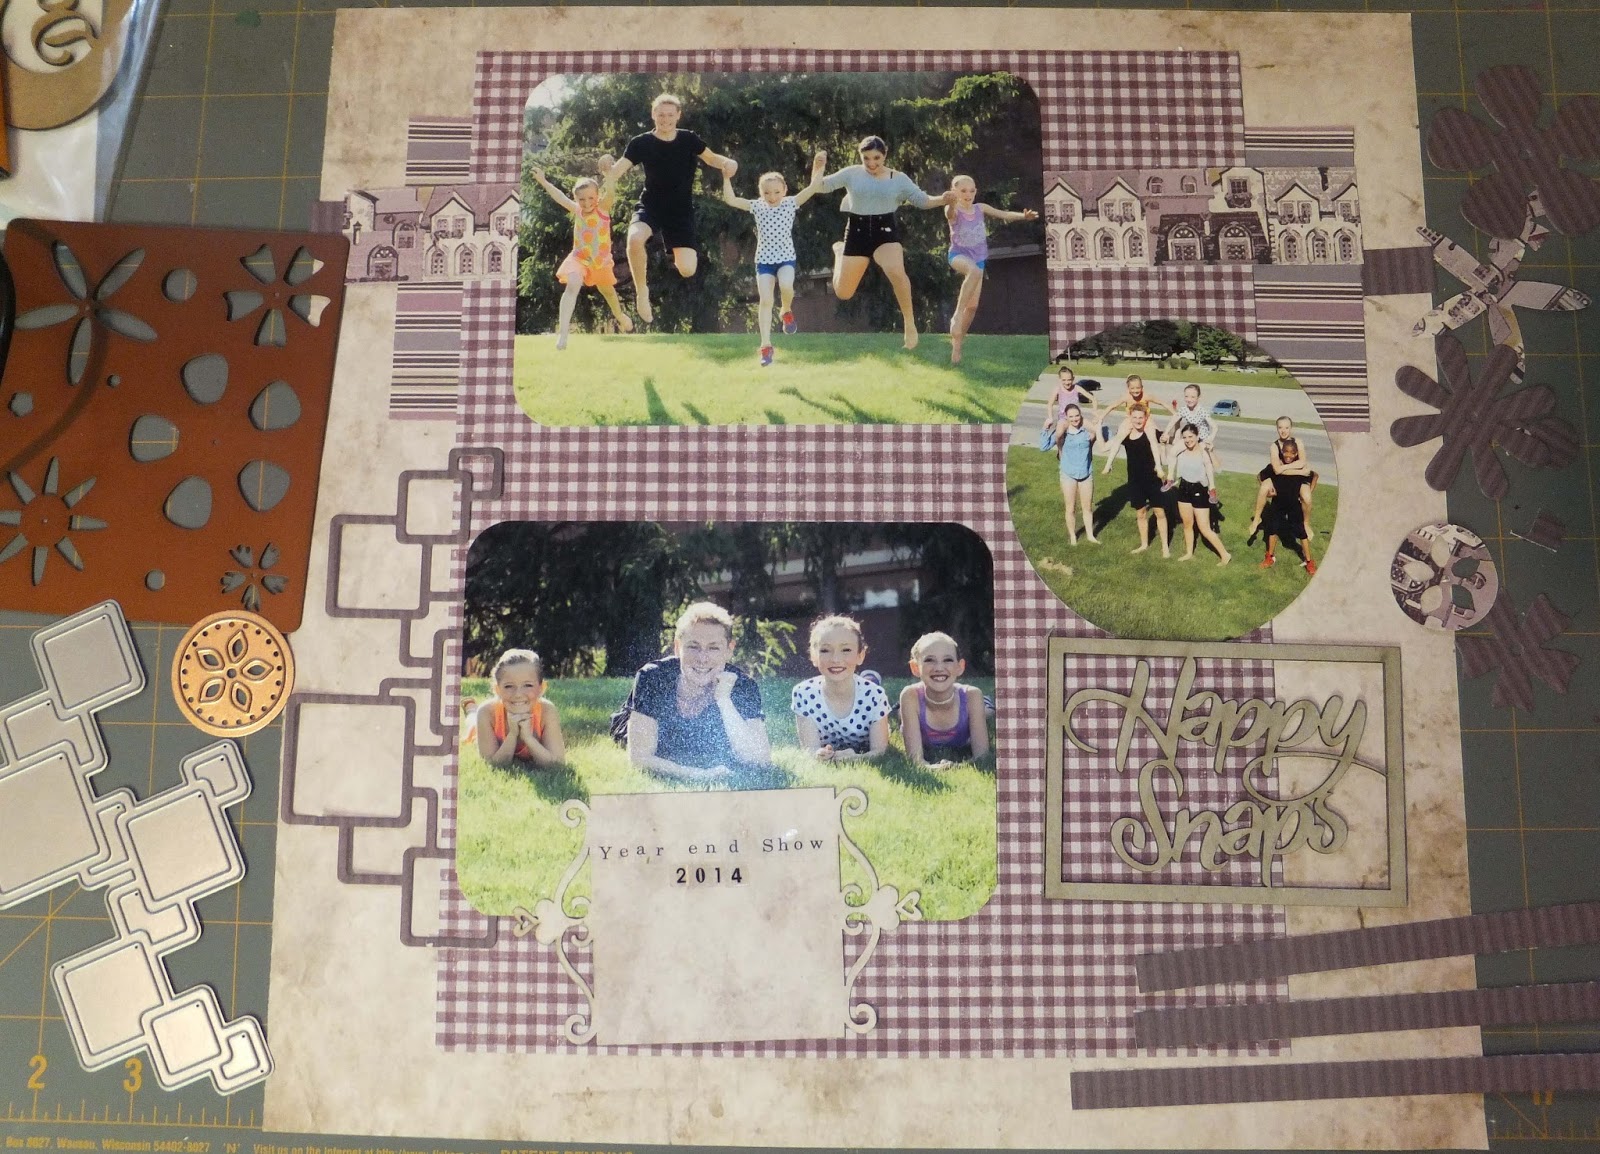
STEP #2: Take a photo of the above for viewing if needed. Now take all the extras off and start inking edges and gluing down the background.

STEP #3: Now add the photos one of which I matted for extra colour and also cut it into a circle for a change of shapes. I then used the stencil and traced the circular lines with black pen. On the upper right corner you and see some add brad accents.

STEP #4: shows a closer look at the circle photo and the lines around it.

STEP #5: In this photo you see the amazing chipboard title which I copic coloured and then added stickles to make it shine.

STEP #6: This section highlights the floral cluster using punched flowers and a background punched doily. Beside it is die cut accent that I added a date and show title with an added accent.

STEP #7: This is just a closer view of the fabulous fun accents you can punch, cut and use from the collection.


Thanks for joining me today. 


Thursday, September 29, 2016

C85 Shabby Rose Collection "MOM" Layout for Fab Scraps


Today at Fab Scraps I am sharing a photo of my mom. I wanted it to be soft, elegant and  wanted a floral cluster of some kind. The C85 Shabby Rose Collection was a perfect pick with the colouring and prints that mixed and matched so well. This collection had some awesome accents to finish it with a touch of antique vintage which suited it so well.

FOR THIS LAYOUT YOU WILL NEED:

Supply List:
Paper: C85 Shabby Rose Collection
Chipboard: CD 85 008 mirror frame
Stickers: ST85001
Ink: Tim Holtz mini pad
Accents: Ribbon
Other: cricut cut title, cardstock, flowers, black micron pen

INSTRUCTIONS:

STEP #1: On this layout I went with paper layers and lots of accents... so start by pulling these items. I like to lay them out and decide which one goes where looking for a change in hues, prints and darkness.


STEP #2: In the above photo it shows the accents that I chose to work with. I added some cardstock for pop of colour and the hinge accent is fussy cut from the paper. I also chose a section of paper to cut and made the border running horizontal for depth and colour.

STEP #3: When all the layers are together I inked the edges with contrasting colour.

STEP #4: I cricut cut the title MOM and then traced around it with a micron black pen.

STEP #5: The cluster is a blend of ribbon and flowers.


STEP #6: The chipboard was inked, matted and on the centre section I added a sticker accent. 


STEP #7: This section showcases part of the photo chipboard frame which is inked and then matted with cardstock for dark border. Below it is a fun sticker matted and added along with some sew easy roller ink stitching.

Thanks for joining me today. 


Wednesday, September 28, 2016

C85 Shabby Rose Collection Love Tag for Fab Scraps


Today at Fab Scraps I am sharing this fun but easy Tag. I used C85 Shabby Rose Collection. Tags come in so many styles, shapes and so many product options. 

FOR THIS LAYOUT YOU WILL NEED:

Supply List:
Paper: C85 Shabby Rose Collection
Stickers: ST85001
Accents: dew drops
Punch: Martha Stewart
Other: cardstock, twine, ribbon, micron black pen


INSTRUCTIONS:

STEP #1: Making tags if fun and easy. I allows you to use small pieces after creating with a new collection. So collect lots of coordinating pieces, some accents and some cardstock for base and matting. Grab your hole punch and some twine and ribbon to tie off.

STEP #2: A standard base is about 3" x 6". I like to cut a base then cut the layer above slightly smaller and this is the piece I create with before putting it onto the main background. This allows for some odd things like wrapping with twined for example before applying to the base.

STEP #3: I chose to use strip pieces which I glued to a base the estimated size to fit on slight angle.
The lowest piece was punched to add more dimension and I added the dew drop accents.

STEP #4: It's always fun to add tags, pennants or banners on a tag. I made a small pennant for out the side. I used 2 different prints to make it matted to black cardstock. I finished with xoxoxo doodled with micron black pen.

STEP #5: I chose the Love ladder sticker to finish off the front of my tag. I stuck it to white cardstock, fussy cut around it and then matted again and fussy cut on black cardstock


STEP #6: When this main piece is all together I then tilt it slightly and glue to the main base which is a full 2 layers when done.

STEP #7 When it's all together you circle punch the layers and then add twine and or ribbon to accent it. 
Tags are done on a small scale so there is so many fun options to create them... layer them... place off the edge and you can add 3D accents of all kinds too.

Thanks for joining me today. 


Tuesday, September 27, 2016

C86 Mother Nature Collection Oh so Peaceful Layout

C86 Mother Nature Collection Oh so Peaceful by Bev Code


FOR THIS LAYOUT YOU WILL NEED:
Paper; C86 Mother Nature Collection, Wild Olives 005, Berry Bliss 008 Butterfly Script 006
Stencil: DS 052 Branches of Leaves
Sticker: ST86 001 post cards
Metals: E6 008 assorted 
Chipboard: DC86 005
Marker: copic
Die: My Memory Box
Other: cardstock, flowers Petaloo, Forever in Time, Lace


INSTRUCTIONS:

STEP #1:  Most often when creating a layout the best starting point is grabbing lots of matching coordinating and contrasting papers with lights, darks and a mix of prints along with some accenting cardstock. These papers should match well with the photo(s) you have pulled to work with.

STEP #2: I like to layer the papers to see what looks the best .. on top of each other... then lay the photos on top to see what looks the best.

STEP #3: When you have a rough idea then I decide on the background and often cut pieces of different shapes and sizes to get the most out of the papers that will be behind the photos. Inking the edges helps them pop where the changes are made. (if you're like me and don't glue down right away my tip to you is to take a photo of what you liked so when you pull it apart to start gluing from the bottom up.. you can view your photo for reference). 

STEP #4: with the background roughly done I like to lay the photos back on and see how things look to the eye. Lots of time you now need some stenciling with a pop of colour, or a die cut shape to pop with both colour and design. These often give the photos a base to hold them together. For this page I added dark green stenciling and some die cut shapes from cardstock.


STEP #5: The title is chosen and for this on I copic coloured the chipboard Oh so Peaceful. 

STEP #6: I chose a few accent options and played with them moving them around and rearranging them until they fit. For this page I chose some great metals in a floral and leaves along with some burlap accents with a lace bow to for clusters in 2 sections of the page.


STEP #7: There was a fab postcard sticker that went great in the title section as part of a clustered section. 

STEP #8: The outer section of chipboard off the title was copic coloured and was used to behind the one photo.... one photo was matted for pop of colour and .. one was left plain. 


Just remember pages should showcase the photos, tell a story and preserve memories for the future to share.

Thanks for stopping by today... .. see you again soon. 

Monday, September 26, 2016

Cozy Christmas using The Rubber Buggy Products


Hi ... how is your day going? OMG is it Christmas sneaking up on us? This collection is Riddersholm Design Our Country Christmas from The Rubber Buggy. What fabulous designs, colours, so rich and elegant all in one..  so amazing. This page is Alex and Sam together for Sam's first Christmas. .. aren't they just too cute.

Supply List:
The Rubber Buggy Products
Paper: Riddersholm Design Our Country Christmas
Chipboards: Blue Fern Studios Christmas Ornaments, Cozy Christmas
Ribbon: Lemon Craft
Markers: Copics
Other: brads, doily, stickers, stickles, liquid pearls


In the close ups I am sharing you can  see some of the details.


Here you get a great view of the fabulous coloured ornaments.. add some glitter to them too. 


Here you see and fabulous Gina's Design Doily, Lemon Craft ribbon and some fun sticker accents.


Notice all the fun ripped papers... super cute little gold title and some more fun xmas accents.


Thanks for visiting..... see you again soon.


Friday, September 23, 2016

Birthday Celebration using Robin's Nest Rose Euphoria Collection


Hi .. so how are you today. Now it's time for the full reveal. I am sharing a baby page with my photo.. it's my 1st birthday. Wasn't I just too cute? I created this page for Robin's Nest  using the Rose Euphoria Collection.

Supply List:
Robin's Nest Products
Accents: rosy straw, dew drops, doily, Journal tag
Other: cricut title, stamping, flowers, lace, spellbinders die, Tim Holtz ink, white signo gel pen


In the close ups you can view some of the details and process to creating my page.
In the photo above using the diamond inspiration from the Robin's Nest paper I stenciled more diamonds using ink pads and the finger sponges. The stenciling was done above, below and outside the photo with papers.


In this section I added lace border, made a clustered floral and added some pink glitter straw accents.


In this section I added a doily with added dew drops.


Below the photo is a border of beads, below is a cricut cut title and a die cut spellbinder border with some more dew drops added. Also under the photo is a journal tag sized to fit.. in pink glitter.


This photo section showcases how the photo is still front and centre on the page to showcase it.


Thanks for stopping by today... hope to see you again soon.


Thursday, September 22, 2016

Sneak Peak at Robin's Nest using Rose Euphoria Collection


Today is sneak peak at the Robin's Nest using Rose Euphoria Collection.
For viewing the full reveal visit the Robin's Nest blog now or come back here tomorrow when I share the full reveal.        Thanks for stopping by.. ... see you again soon,


Monday, September 19, 2016

The Florida Aquarium using my The Rubber Buggy products


Hi ... how is your day going? I have been crafting with Blue Fern Studio Timeless Collection. This collection is from The Rubber Buggy. What fabulous designs, colours and the softness is perfect with my photos. These photos are from the Aquarium in Florida which we visited when family was there for a vacation with us.

Supply List:
The Rubber Buggy Products
Paper: Blue Fern Studio Timeless
Chipboard: Blue Fern Studio Arrow Words, Spring Iris small
Stamp: Blue Fern Studio Shabby Edges
Ink: Color Box, Memento, paint
Other: mesh, stickers, black pen


In the close ups I am sharing the you can view more of the details.


The chipboard is painted white and some mesh is used in the background of the photo.


Arrow words are painted for the title and a matted photo has more mesh accents in behind. The Florida is small stickers. Notice the shabby edges stamping under the photo!


Up next is the 2nd page of the double... it shares more Aquarium photos.

Supply List:
The Rubber Buggy Products
Paper; Blue Fern Studio Timeless
Chipboard: Blue Fern Studio spring iris small
Other: mesh, black pen, paint

Added photos showcase the details on this page.


Going with the same accents as page 1 you see painted chipboards and mess accents.


More of the same accents on this close up.. but added the sticker title Aquarium in beige slightly fussy letters.


Thanks for visiting..... hope to see you again soon.