Wednesday, November 30, 2011
My Memories weekly challenge
HI again.. OMG I am having so much fun trying the new digital software that I won. Bought a few things and grabbed some of the freebies too. Today I ventured into shadows. Can't wait to see what's next?
So the challenge this week at My Memories is Family Traditions.
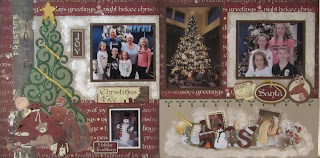
I have tree decorating traditions where the grand kids have a sleepover, xmas movie and help me decorate the huge tree. It's a special time of year for me with the grand kids. The above page displays our time together. What great paper and amazing fun accents... perfect for this one.
This is a vintage style page.. used a very old photo from 1957. What a great way to save family ancestry for those who follow.
Tuesday, November 29, 2011
My Memories Challenge "Why I'm Thankful"
Well I am Thankful because I won the My Memories Software.. and I couldn't help but try it right away so I have 2 layouts that I did digitally and am thankful to share them with you.
Thursday, November 24, 2011
Terrifically Thrilling Thursday & a Christmas card
Hi hope your having a great day this Thursday. Can't believe we're over half through November and Christmas is getting so close. Hope you started your xmas cards. I thought I'd share an easy one with you today.
Using the Kreaxions Punch #312 with insert A I punched LOTS and LOTS of the little snowflakes (lots of them). I then drew a pencil circle on the black background .. Of course using the lead pencil in my Kreaxions Circle Cutter.. then gluing all the small pieces individually I started layering them around the pencil circle line in a single row first. I then added 2 more rounds spacing them for a wider wreath. Some I put the silver side up and some the white side up giving it a 2 tone look.
For the sentiment I found a vellum sticker for the centre of the wreath.
In the up close photo you can see the layers in more detail and the cute 3D sticker accent.
Sure glad to see you today.. hope you come back soon.. Bev DT
Wednesday, November 23, 2011
Sunday, November 20, 2011
OHSC at MSW with Ginni & ORIGAMI XMAS TREE VIDEO
So Ginni has a new title at My Sketch World - OHSC Coordinator and she does an amazing job.
She pulls it all together for us to play once a month and mixes it up with 5 or 6 card sketches or a layout. She is known to tease us with clues and prepares us with hints.
So last nights OHSC was again amazing and fun and with Lucy Chesna Designs Sketches how can you go wrong. Be sure to check it out and also watch for and join us in the New Year when they start up again.This is my page from the OHSC last night.. it was great fun to play along with the ladies.
I used Imaginisce and me & my BIG ideas paper, foil chipboard, felt accents, metal snowflakes and Karen Foster Design sticker titling. I added a ripped section, distress and inked edges and last but not least my Origami Xmas Tree.
So today I thought I'd share again with you the pattern and video for the Origami Xmas Tree.. so you can make them again at this time of year.
Thanks for visiting.. and I always look forward to hearing from you.. have a great day.
SWING CARD Video and Tutorial
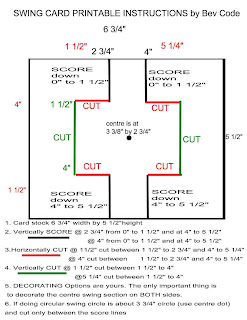
Hi ladies.. So I am also sharing my previous months Video and Tutorial from My Sketch World. We are going to learn how to make the SWING CARD.
Supplies:
paper cutter with cutter and scoring blade
cardstock
Misc. craps for decorating the card with accents and trims
Patterned paper if used can also be double sided so your inside and outside are finished.
We are also using Lucy's Card Sketch for October .. using your imagination and creativity.. we will apply the sketch to a swing card.
Here is the SWING CARD Video Tutorial.
Print the instructions to help you make the swing card after you have viewed the Video.
Here is the front of my card... I used the circular swing option so I could better follow the sketch by Lucy.
Here is the back of my card... using double print paper allows for both side to look amazing.
Here is a card previously made with the centre swing as a square.(not using Lucy's October Card sketch).
Sure glad to share this with you today.. be sure to stop by My Sketch World Forum and see what everyone is up to and also check my section Tutorials by Bev to share your take on the Swing Card with us.
MISTING AND MASKING TUTORIAL
Welcome ladies.. So every month now I get to share and inspire at My Sketch World as Video Tutorial Designer with a technique of my choice and share either a tutorial or video or both. I have had so much fun doing these. They inspire me to step out of my box and experiment. I guess some of the things I do aren't new to everyone but I know when I just started I would have loved to have had someone share and show me some of the things I now get to share with you.
So at the end or beginning of every month after posting only at MSW forum and Blog I have decided to post on my personal blog and share with you too.
I am excited to share MISTING AND MASKING with you today.
Supplies:
cardstock
MISTS (Tattered Angels, Andirondack, Memories Mists or Perfect Pearls)
letters or shapes of either cricut cut paper, chipboard
paper or plastic background diecuts
piece of lace fabric
piece of curtain holey fabric
piece of plastic needlepoint shapes
paper doilies
Either a box to mist into or a plastic work sheet
paper towels and water for clean up
So lets get messy. The easiest thing to do is misting... just spray the background any way you like... lightly or heavy... part of page or the whole thing... lots of options... one colour or multi colour.
On this sample I knew the paper and photo would be through the centre section so I went lighter through the centre.
Here is a sample of a paper die cut.
Here is the finished background after spraying through the paper die cut.
Here is a sample of a plastic circle used for needlepoint.
Here is the finished background after spraying through the holes in the plastic.
Here is a sample of a piece of lace... just enough holes to give a great pattern.
Here is the finished background after spraying through the lace.
Here is a sample of curtain fabric with bigger holes... only covering part of the cardstock.
Here is the finished background after spraying through the fabric and into the upper half of the paper also.
Here is the finished background after spraying over chipboard letters for the name and also through a piece of plastic heart and also through a paper doiley.
I am sure you have many other ideas also of things, shapes, fabrics etc that you can use to achieve many backgrounds with misting and masking.
NOW I'd like to share with you ways to finish a layout page starting with the above backgrounds.
We will also be using the amazing Lucy Chesna Design October Layout Sketch 2011 to finish these projects.
First using the plain misted background and the sketch .. here is my finished layout.
On this one I placed the sketch portion to the centre but full left and right.... letting the misting show on the top and bottom.
Next using the curtain holey fabric background and the sketch... here is my finished layout.
On this one I stretched the sketch out a bit more to cover more of the page.. especially with the accents and trims.
Lastly using the big full die cut background and the sketch.. here is my finished layout.
On this one I didn't want to cover all the beautiful masking so I used the open space technique and condensed the sketch portion in tight and compact.
Sure hope you enjoyed this today.
Be sure to check out My Sketch World forum and Tutorials with Bev.
Share with us any of your ideas and projects using misting and masking.
Saturday, November 19, 2011
Cookin' Up Creations Sketchy Saturday with ME
Cookin' Up Creations Sketchy Saturday in the Blue Plate Specials.. hosted today by ME.. yes I get to share a sketch of mine with you.. and I even made it a double. So many scrappers still love a good double page layout... I know it's still one of my favourites to work with.
With Christmas so close I thought it would be fun to scrap some older xmas photos so I am ready for the new batch from this year.
In keeping with the Food theme this month I thought it would be fun to share a REAL recipe with you. I have never rolled pie crust in my life because I have this amazing easy recipe.
Mazola Oil Pie Crust
In a pie plate add 1 1/2 Cups of Flour, a pinch of sugar, a pinch of salt.
In a measuring cup add 1/2 cup milk with 2 TBSP of mazola oil.
Add the wet liquids from the measuring cup into the pie plate of dry ingredients.
Mix with a fork until everything is moist... now using your fingers knead and mix the dough.. when all moist pat it out into the pie plate and it's done... YES it's done.
Add your favourite filling and bake.
So now you have a sketch to work with and a recipe..
Can't wait to see what you make with it.
Below is the single pages for more detailed viewing.
Thanks for joining me today.
Thursday, November 17, 2011
Inspiration and Creativity
This page is monochromatic, shiny, has paint daubed background, lots of circles, doodles and clusters with flowers and metal. On this page I multi tasked using the sketch at 3 Scrappy Boys, the circle and colour scheme from Cookin' Up Creations and My Scraps and More Challenge for a Family theme with 2 journal spots.This page has many memories of my husbands day spent on the farm... tucked away it was so quiet, you walked miles to school everyday and had a huge yard as a playground.
Did you know when your looking for inspiration.. it comes from many avenues?
Some sites offer challenges, colour inspiration, scraplifting some or all of a layout, some sketches... but they all have one thing in common.. the amazing members that inspire and create everyday.
Be sure to check what they have to share.
Today however I used some sketches. They are from 3 Scrappy Boys November Sketch Challenges which offered many different sketches from many different talented people.
The top one is a sketchy thursdays sketch and the bottom one is creative scrappers #180.
If you like what you see be sure to check them out either at 3 Scrappy Boys, Sketchy Thursdays or Creative Scrappers.
Terrifically Thrilling Thursday and 4 Kreaxions Punches & Circle Cutter too
Terrifically Thrilling Thursday, Kreaxions Circle Cutter and 4 punches on the same layout and it is so beautiful, soft and elegant.
On the bottom I made the scalloped border using the Kreaxions Circle Cutter.Quick refresher course to do this. Draw a pencil line across the paper. Position the blade and tip on the line.. cut the 1st half circle to the other side of line. Pick up and reposition the next scallop the same as the first .. repeat across the whole line.In the centre of each scallop I punched the Kreaxions Punch #604 the butterfly.
On the top edge of the scallop I used Kreaxions Punch #311 with insert A and then weaved a ribbon through it.On the left matted piece I used Kreaxions Punch #309 and on the right side I used Kreaxions Punch #310 with no insert... and the yellow piece on the right is the fall away piece.
Lots of fun accents, clustered flowers and sparkle title, rubons, and pearls.
Thanks for joining me today .. take care and see you again soon.
Subscribe to:
Posts (Atom)