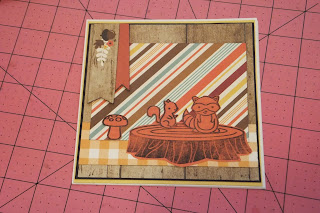
Hi.. this is my 2nd card for Creative Escape Papercrafting using the Fall Frenzy Kit. It is also an easel card showcasing lots of amazing layers, colours and accents with some cool stamping.
Description
This kit is packed with hand-picked goodies to enable you to have a fall card making frenzy. It’s perfect for Thanksgiving cards but also has elements that you can use all year.
The kit contains:
1 “Forest Feast” Lawn Fawn stamp set featuring 14 images and 11 words/phrases (made in the USA)
1 “So Thankful for You” Lawn Fawn die, approx. 5.75″ long (made in the USA)
1 Echo Park “A Perfect Autumn” 12×12 Double Sided Paper 3″x4″ Journaling Cards (cut into 2 pieces for shipment) (made in the USA)
1 Echo Park “A Perfect Autumn” Seasonal Stripe, approx. 12″x1.75″ (made in the USA)
12 double-sided 6″x6″ sheets of Echo Park “A Perfect Autumn” paper (made in the USA)
1 sheet of 8.5″x11″ yellow card stock
2 sheets of 8.5″x11″ kraft card stock
3 sheets of 8.5″x11″ white card stock
1 sheet of 8.5″x5.5″ copper card stock
1 sheet of 8.5″x5.5″ water color paper
1 sheet of 8.5″x5.5″ alcohol marker paper
1 Fall Frenzy sequins mix (1.5 teaspoons of sequins)
3 assorted die cut pumpkins (various sizes)
10 assorted die cut leaves (various colors and shapes)
3ft of yellow and white cord
3ft of jute twine
3ft of natural hemp cord
1 bottle of Golden Sunset Nuvo Glitter Drops (1 fl oz)
Up first I laid out on orange paper the stamp images I wanted to work with.
I used my mini misti stamping tool.
I thanks matted the main background paper. and cut some other pieces.
With pieces ready I also stamped the sentiment.
With the basics all ready I foam popped up the pendant cluster.
Here is the photo of my main front part of the card.
Using my Big Shot Express I die cut the Lawn Fawn sentiment.
I shaped the card base to form the easel style. My easy method is to just fold the front panel into the centre at the half way fold. To form the front I cut an extra piece the same size as the full front panel and decorate it.
The front panel gets glued to only the one half section of the fold.
Now on the inside I decorate the panel with a cardstock background to start.
I then use smaller pieces to decorate the inside, add the extra stamped and matted section and through the upper section I use a border piece glued on top of all the layers to make the ledge to hold the front panel up in place.
The die cut sentiment was added to the front and the card is done.... and the easel portion of the card is perfect... Easel sections also add some extra colour and decor to a card.
Thanks for stopping by... hope to see you again soon.


1 comment:
Bev it's sweet and beautiful
Gr Karin
Post a Comment