The Robin's Nest is having a DT Call and I am excited to be submitting again and reapplying for the team. Originally I only had the clear dew drops from the Robin's Nest Product line but OMG after being with the team now for almost 2 years I have had the chance to use so much more of their
Product line. The company is continuing to grow .. they have added more paper collections which now include accent packs, ribbon, die cut packs and even some chipboards... all which are a perfect match and mix to their already amazing product lines. I am hoping to stick around again to get to use even more amazing products from the Robin's Nest line.
**************************************************
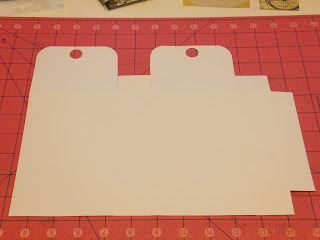
Up first I am sharing a Gift box that can be used for fun small gifts, used to add small token boxes to your table settings for parties... and OMG they can be decorated to suit so many themes throughout the year.
Following the instruction sheet above my base is ready. Now using Robin's Nest products I am decorating it using some of my smaller stash pieces, some cute accents, dew drops and great ribbons to tie off my box.
Here is my view of my finished decorated box.
Here is the back side which is decorated also.
In the close ups you can view the details. The upper lid section boasts fun dew drops, a strip of glitter cardboard, cute accents and tied off with a ribbon bow.
The main front of the box had a base paper, a matching glitter strip accent, a cute plastic butterfly accent and a glitter matted card accent. All showcase the amazing paper line with matching accents and trims.
Supply List:
The Robin's Nest Products:
Ribbon: Saffron ribbon
Other: misc cardstock, circle punch
**************************************************
Up Next is a Joy Fold Card. Above is the Supply List for you to pull required supplies to make this fun easy card.
Starting with the 2 cardstock base pieces
Score your 4 1/4" x 8 1/2" piece of
cardstock at 5 1/2".
Score your 3" x 8" piece of cardstock at
4".
Now using the measurements for designer papers or like I did cut them just slightly smaller to leave a cardstock base outline to allow for a pop of print paper on all sides. Your choice?
Notice the placement of the inside panel.. slightly to the right side to allow the best overlap to front so we can add the corner accent that helps hold the card closed.
You can add a verse to the inside panel to your liking.. or just add a print paper.
This view shows the front panel finished. I used multiple layers to add colour, texture with glitter cardstock and some fun clustered die cut accents and more single accents. It's a little hard to see but on the left front I add a transparent dotted ribbon for trim. Now special note to the very bottom left corner. I used multi layers of die cuts and added a dew drop which is the card closing piece. You only glue the outer left and bottom side so the inside right is open to slide the other panel into to close securely.
Thanks for visiting today.... hope to see you again soon.


5 comments:
They are soooo pretty. The top one is my fave. Just love the "window".
Gorgeous projects. I love them. I've seen you make so many beautiful projects for the Robin's Nest. Good luck for this term.
:) Sher
AWESOME!!!!
Great job Bev.
what a fun idea, thanks for your interest in being on the Robin Nest team again
Post a Comment