Monday, November 30, 2015

Off the Rails Scrapbooking December Mood Board


I used part of the colour palette below from the December Off the Rails Scrapbooking mood board to create my page above. I however did not go with the Christmas theme. This colouring made me think of summer, sunshine and the heat of the season. With that in mind I cricut cut the 3 yellow accents for the page.  I added the great upper and lower borders to the central blue paper that reminds us of sky and water during the summer months. 

Supply List:
Paper: MME Now & Then, Maja Design Vintage Summer Basic, EP Walking on Sunshine
Stickers: EP Summer Bliss
Twine: Bella Creationz Timeless twine
Cut files: Cricut
Stencil: The Crafters Workshop
Modeling Paste: Liquitex


In the close ups you get a better view and more details. This section showcases the fun sunburst with the cute accent in centre of it. Stenciled modeling paste clusters the Title.


I used splatters of stenciled modeling paste throughout the page. What a cute Heat wave cricut cut file with a sunshine.


The cute photo is matted with print paper for pop of colour and is surrounded with complimentary stickers.

Be sure to visit the Off the Rails Scrapbooking Blog to view what the other Design team have to share. Thanks for stopping by.... see you again soon.

Photobucket

Robin's Nest DT Call project


The Robin's Nest is having a DT Call and I am excited to be submitting again and reapplying for the team. Originally I only had  the clear dew drops  from the Robin's Nest Product line but OMG after being with the team now for almost 2 years  I have had the chance to use so much more of their
Product line. The company is continuing to grow .. they have added more paper collections which now include accent packs, ribbon, die cut packs and even some chipboards... all which are a perfect match and mix to their already amazing product lines. I am hoping to stick around again to get to use even more amazing products from the Robin's Nest line.

**************************************************

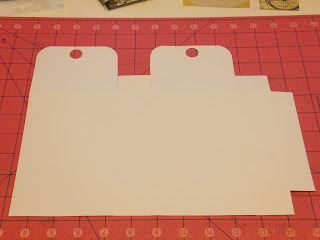
Up first I am sharing a Gift box that can be used for fun small gifts, used to add small token boxes to your table settings for parties... and OMG they can be decorated to suit so many themes throughout the year.


Following the instruction sheet above my base is ready. Now using Robin's Nest products I am decorating it using some of my smaller stash pieces, some cute accents, dew drops and great ribbons to tie off my box.


Here is my view of my finished decorated box.


Here is the back side which is decorated also.


In the close ups you can view the details. The upper lid section boasts fun dew drops, a strip of glitter cardboard, cute accents and tied off with a ribbon bow.


The main front of the box had a base paper, a matching glitter strip accent, a cute plastic butterfly accent and a glitter matted card accent. All showcase the amazing paper line with matching accents and trims.

Supply List:
The Robin's Nest Products:
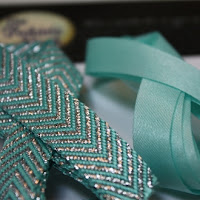
Ribbon: Saffron ribbon
Other: misc cardstock, circle punch


**************************************************

Up Next is a Joy Fold Card. Above is the Supply List for you to pull required supplies to make this fun easy card.


Starting with the 2 cardstock base pieces 
Score your 4 1/4" x 8 1/2" piece of cardstock at 5 1/2".
Score your 3" x 8" piece of cardstock at 4".


Now using the measurements for designer papers or like I did cut them just slightly smaller to leave a cardstock base outline to allow for a pop of print paper on all sides. Your choice?
Notice the placement of the inside panel.. slightly to the right side to allow the best overlap to front so we can add the corner accent that helps hold the card closed.


You can add a verse to the inside panel to your liking.. or just add a print paper.


This view shows the front panel finished. I used multiple layers to add colour, texture with glitter cardstock and some fun clustered die cut accents and more single accents. It's a little hard to see but on the left front I add a transparent dotted ribbon for trim. Now special note to the very bottom left corner. I used multi layers of die cuts and added a dew drop which is the card closing piece. You only glue the outer left and bottom side so the inside right is open to slide the other panel into to close securely.

Thanks for visiting today.... hope to see you again soon.


Saturday, November 28, 2015

Relax and Escape at the Beach with Paper House Die Cut Sticker packs


At Paper House Productions I am sharing this project which uses the Die Cut Sticker Packs. OMG there are so many to choose from but I am creating this fun beach page using the Serene Beach die cut pack. d What amazing fun and perfect accents to any project.

I started with some fun stenciled background using modeling paste which dries so fast when working with it. I added a small piece of punchinella for a pop of shimmer in blue, added depth with layers and texture and some great accents.


I added some 3D sticker beach accents and also a canvas beach accent. All these mixed together were a perfect match for the fun beach page.


This section showcases the fun arrow relax used to form a clustered "relax and escape" using small alpha stickers along with the newest 3D puffy words.


In this section you can see where I joined 3 different patterned papers to give me the background I was looking for. The main sheet was sand and green sprigs. I fussy cut the water cresting at the shore for the bottom and then I added the worded border sticker to base the page. 
It also shows pieces from the die cut pack.. the star shell,  the lighthouse and the great "life's better at the beach piece. All are amazing. 

Supply List:
Paper House Products:
Paper: PP-0019EMS Beaches of the World
Stickers and Accents: STDM -0085 3D stickers, STDC-0004 Die Cuts, STCX -1005 CS Sticker Sheet, ST -2285E Sticky Pix, STCO -0001 Cork'd, STCA -0008 Canvas, Puffy Stickers STP -0302
Other: 
Modeling Paste: Liquitex
Stencil: The Work Crafters
Punchinella

Thanks for stopping by .. see you again soon,

Friday, November 27, 2015

Full Reveal from the Robin's Nest.. card box and cards


I am now sharing my full reveal from the Robin's Nest. I am sharing a box with a lid to decorate and  use it as a gift box to put some assorted cards into for a small xmas token gift... when you don't do a gift exchange but want to share something personal with a dear friend or family member.
I didn't have a set pattern because I just wanted it to hold the cards which had some different sizes. So basically made the  base slightly bigger then the largest card with envelope and then the lid was just a tad bigger then that to close over it.
I will share a link I found though for a stand shape of box with a lid if your interested.

https://search.yahoo.com/search?fr=mcafee&type=C211US91036D20151110&p=box+template+with+separate+lid

 and here is the photo of it.. for you to view. You would still have to adjust to the base size required.


When my box was made I to try something a cool to decorate it. I cut a base paper just slightly smaller then the lid size. I pencil traced a circle and then drew sun ray lines to the outer edges. This I hand cut and applied to my lid. I added the fun metal accent and made the label.

Supply List:
Other: Momenta metal accent, misc tag

 
Now I am going to share some of the cards I custom made to put in my card box for a Christmas gift.


I use cardstock base cards and envelopes to create most of these. Sometimes I cut a base front to work on until totally finished so I can wrap around ribbon, twine etc.. and then glue the whole base front to the card front. I am using lots of Robin's Nest scraps from my stash to create my cards and then using the great new accents that I have. 

Supply List:
Ribbon: Azure ribbon
Other: sew easy ink roller, punch


Up next is a Birthday card. Super blue stripes with a great bike die cut and other accent shapes.

Supply List:


This is neutral colour card for a general celebration. I used monochromatic grey combos of prints. added a rubon sentiment with layers behind for pop of colour. I punched a border and added a strip of straw accent.


Supply List:
Rubon : Viva
Accent: straw
Other: misc cardstock,


This card is a congratulations card and I went to dark misc colours so it could be for anyone. I added some additional Kreaxions cut circles to pop on the circular print paper. The sew easy ink roller makes great corners.

Supply List
Rub-on: Viva 
Other: misc cardstock, sew easy ink roller

Thanks for stopping by.. hope to see you again soon.