Wednesday, August 31, 2016

Hear ye Hear ye! I am excited to share that I am now a ScraPerfect Designer


Hi.... so excited to announce that I am a ScraPerfect designer. Can't wait to share all the amazing products I will be working with. 

Bio:
I was new to online scrapping since Apr 2009. There were so many amazing sites that were my learning curve to this amazing world of scrapbooking. My name is Bev Code and I have been scrapping almost 7 years. I am a wife, mother and gramma that loves being retired and now have time to scrap to my heart's content. I love scrapbooking along with fun things it entails with online friends, forums and FB. The learning process has been interesting and creative also. Other crafts I love also are needlepoint, sewing, knitting, crochet and taking lots of photos. Family and friends are the subjects of my scrapping along with nature, ancestry and vacation sites. I live in Kitchener  Ontario right now with my mom as we sold our home of 27 years and we are currently looking for our new home. We also spend some winter months in Florida where I take my scrapping with me for the extended time. 

Can't wait to get to started and hope you will follow me and my new adventures.

Fab Scraps C86 Mother Nature Collection Tag


Hi.. super excited today to share my Fab Scraps blog post with you using C86 Mother Nature Collection. Be sure to visit the store for this collection and the many others available. They are all amazing with fabulous mix of papers, stencils and accents. 


FOR THIS TAG YOU WILL NEED:

Supply List:
Ink: Tim Holtz mini pad
Stencil: The Crafters Workshop
Punch: Kreaxions
Die: Memory Box
Others: flowers, leaves, ribbons, beads, cardstock, twine

INSTRUCTIONS:

STEP #1: Making tags are fun and easy. They are small and that allows you to use stash from collections after you done making the big products first. Up first then is to pull lots of scraps that coordinate, cardstock and lots of options for accents.


STEP #2: As per above photo I pulled lots of papers...  cut the cardstock base roughly 3" x 6"  standard size and using the prints I cut pieces, die cut an accent, punched a border and made some matted pennants. 


STEP #3: I punched the corner of this tag base on the upper corners only. Ink all the edges, ink through stencil on the upper right corner.  The Post Card piece is fussy cut from the print paper.


STEP #4: We can assemble the layers now matting some for extra colours, layers and shapes. By doing this process first it allows us to wrap twine around the whole piece. 


STEP #5:  Now we put together the back piece .... adding the die cut honey combs, inked stenciling and on the lower edge the floral punched border.

STEP #6: Now put the 3 layers together using a tilt position. 


STEP #7: Assemble the 2 clusters of flowers with leaves and the bigger one I wrapped the stems with ribbon and tied off with a bow. Position the clusters and glue down. 

STEP #8: Punch the circular hole.... tie off with coordinating ribbons and a stand of beads.

Thanks for joining me today. 

Monday, August 29, 2016

Adore Wedding page at The Rubber Buggy


hi.. so I am still creating wedding pages... doing black and white and colour photos. I am using products from The Rubber Buggy. The Blue Fern Studio Collections have been amazing and have the perfect touch of softness and elegance for wedding pages.

Supply List;
The Rubber Buggy Products
Paper: Blue Fern Studio Tranquility Stillness
Stencils: TCW 455s, 605s, 507s
Ink: Tim Hotlz mini pads
Accent: ART C doily
Other: flowers, fern stickers, chipboard


In the close ups I'll share some of my techniques. I use both Color Box and Tim Holtz inks... shading to the outer edges of where the photo will be.


Now using some shades of green I add more defined straight lines through out the yellow.


Now I used green paint splatter applied by flicking the paint brush.


Now it's stencil time. I am using a few of them and mix up the yellow and green to them.


Here is my finished stenciling all placed to the outer edges of the photo spot.


At this point I play all the proposed accents on the page in estimated placement. I take a photo so when I take them all off to start gluing from the back going forward I have a photo to view. 


In these close ups you can see the page come together. In the one above you can see I chose to move everything up higher from my sample photo to leave the 3 hearts showing in full size.


I loved the natural chipboard colouring with the paper and inking. 


The stenciling and colouring is perfect for this page. I love the hearts and the word Love... just perfect.


I decided on single flowers but originally had tried larger clusters. They became too strong and went back to one each.  The fern leaves are stickers and the other accent is the doily.
At this point less is better so I chose to stop at this point.


Thanks for stopping by.. see you again soon.


Friday, August 26, 2016

Open Handle Friendship Wraps at The Robin's Nest


Today at the Robin's Nest I am creating with some of these amazing Friendship Wraps. What a great new addition to the product lines. So many fabulous different shapes and styles to pick from.

Supply List: 
Dew Drops: Fairy Dust
Chipboard: shape accents
Fairy: Gina Designs
Other: Memory Box Die, ribbons, lace, flowers, leaves, beads, Kreaxions punch, copic markers, liquid pearls

Here is the one specifically that I am using today.


Instructions:
1. Assemble the box using glue to firmly hold it in place.
2. Pull some accents that you would like to use on this.


3. Trim base with paper wrapped around.


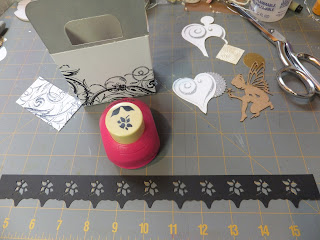
4. I chose to punch a solid border to accent around the upper edge.


5. With the main paper and border done ... the rest is easy. Just trim and accent using things in your stash. On this side I die cut a gold accent using Memory Box die, then clustered Robin's Nest shapes cut from glitter chipboard and the fun silver heart accent. Dew drops were added to the upper right corner and a great cluster of ribbon, lace and beads tied off to finish this side.


6. On this side I made a cluster of flowers, some leaves and beads and wrapped and tied them off with ribbon. To match the other side I added the drew drops and using Gina Design fairy I copic coloured her and added liquid pearls to her wings.


This cute little Friendship Wrap could be used at parties as hostess gifts, candy boxes for those kids get togethers or fabulous fun table pieces for so many occasions. Notice from the side that they have great depth to add what ever you would like.

*********************************

I was having so much fun I made another one... to share with you.


For this one I folded the upper handles to fold down just a little and meet in the middle.

Supply List:
Paper: Olive Stripe, 
Other: lace, ribbon, beads


Here is the front view with all the fun accents from Robin's Nest.


The other side with more accents... so many to choose from.


The side view where I left it plain sparkle paper in forest green with gold. Tie off the top with ribbons, lace and beads and you have a 2nd  Friendship Wrap box all done.


Thanks for stopping by today... see you again soon.

Photobucket

Thursday, August 25, 2016

Sneak Peaks for the Robin's Nest Friendship Wraps


Today at the Robin's Nest I am creating with some of these amazing Friendship Wraps. What a great new addition to the product lines. So many fabulous different shapes and styles to pick from.
Be sure to visit the Robin's Nest blog for full details ... today I am sharing my sneak peaks only.


Thanks for stopping by today... see you again soon but come back tomorrow when I reveal the full project. 

Photobucket