Welcome to my blog today. I am hosting the Robin's Nest project today. I am sharing a photo album that I altered from pink flowers to a more rustic Zoo type themed cover.
Supply List:
The Robin's Nest Products
Paper: Zebra Cream Animal Print, Black Herringbone, Leaf Stripe Cardstock, Lodge cut out Cardstock, Airplane Cardstock
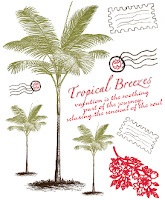
Rubons: Palm Tree
Other: ribbon, mesh, washi tape, copic marker, Mod Podge
The cover was a beautiful fun bold bright pink with flowers.. not exactly what I wanted for memories of our trip to the zoo. My eldest son and family visited us in Florida early New Year and we had a great excursion to the Brevard Zoo while they were here.
Instructions:
1. Start by taking your album apart into pieces.
2. If you know that the outer edges need colour cover do it first. I used a black copic marker to cover the edges that would show... but would be too hard to cover with paper.
3. Cover the outer front and back to your liking. I use glue and Mod Podge. Be sure to cover the full area, Smooth over to eliminate all air bubbles. Let dry totally before working on this section again.
4. While album covers are drying you can make and decorate a panel to go on the front cover to show what the album contains. I used herringbone CS and the reverse side of Airplane CS to start the base of my front cover. I added some mesh, cut tag off lodge CS, added lots of rubons that suited the theme of adventure, Florida and travel.
5. I added some washi tape for depth and layers and matted some of the accents.
6. Now I coated it with Mod Podge to cover it all, gives it a shimmer and then let it totally dry.
7. Here is a tip for drying when things along the outer edges are wet also... but the centre is dry. Balance them up off the work surface using say.... a coffee mug? Like in the photo. It was perfect.
8. While things are drying again.. you can cover and get the end panel covered.
9. While things were still drying I also sorted my photos for the album and placed them inside ready to go.
10. Here is my finished album done. It's a little thick so I ribbon tied the album closed so it was spreading open. This will make a great gift for my son and family full of memories or their Florida trip and time spent with us.
Here is the back done in a different print.... your options to use what ever you like.
A different side view of the album with pages inserted and all finished.
Thanks for stopping by. I had fun sharing this easy to make projects and sure you will enjoy making one too some day..... perfect token gift for so many memories.


