Tuesday, March 31, 2015

Off the Rails Scrapbooking April Mood board is awesome


Off the Rails mood board this month is awesome. You also have the choice of one other
one but this is the one I chose above... super fun, bright and rich looking.


I am sharing this super card with you using the OTR mood board.
Below is the photo of my start pieces... lots of colour and texture.
The front layered section is stampes and I matted the sentiment to make it pop even more.
The finishing touch is the multi coloured wrapping of Bella Creations Timeless Twine with a finishing bow.


I used paint, gesso and texturing to start the background,
The other matted section is ready for stamping in black ink.

Be sure to stop over at the Off the Rails blog where other DT are ready to inspire you too.

Photobucket

Monday, March 30, 2015

Robin's Nest Recipe BLOG HOP


Robin's Nest is hosting a Recipe Blog Hop... sure hope you'll join us.

Supply List: 
Robin's Nest Products: Paper: Daisy Honey Comb, Peach Glitter cardstock,
Punch: Martha Stewart
Pen: mircron 01
Twine: Bella Creationz Timeless Twine


In the close ups you can view some of the unique fun accents from Robin's Nest.
Here show cases the Alpha letters, pieces from a tag kit with dew drops and ribbon included.


In this close up there are fun circular discs with added accents.
I punched the corners of the paper and added Bella Creationz Timeless twine to the bottom border.


In this close up the punched edges show better and also the fun dew drops.
They come in so many colours it's so easy to match almost any project.

Be sure to visit the Robin's Nest Blog to view and follow the other
 Design Teams links to their recipes too.

Photobucket

Saturday, March 28, 2015

Full Robin's Nest Reveal


March has been SHOE month at Robin's Nest. So below I share another shoe project with link to full instructions with Helen Hustson....  but first up is a card I made to share using my sketch from 
the Turtle Soup March Sketchathon.

Supply List:
Robin's Nest Products: Papers Stripe French Vanilla, 
Sour Apple Glitter , Khaki Glitter, Creme Awning Gold Glitter
Dew Drops: 
Ink: Tim Holtz ranger
Sentiment: Adorn It
Accents: Creating with Details
Twine: Bella Creationz Timeless Twine
Chippie: Gina's Design
Sketch: Bev Code


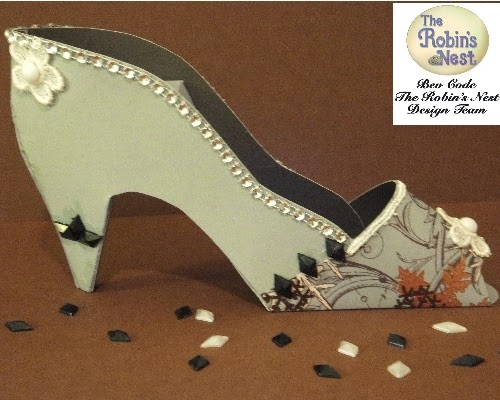
Now I am excited to share this super fun (but fairly easy) shoe.


Thanks to Ellen Hutson for this amazing template to use... here is the link.
http://www.creatingkeepsakes.com/articles/free_shoe_template_download and Instructions.
I printed it on 8.5x11" .

Supply List: 
Paper: Robin's Nest Winter Retreat Swirl
Dew Drops: Robin's Nest diamond dew drops, regular white dew drops
Glue:Beacon 3-in-1
Misc accents: lace, bling


After putting it all together you decorate it.
A touch of lace, dew drops, some bling and it's done.


Sure happy to have shared with you today. Come back again for sure.


********** Be sure to mark your calendars ***********


Photobucket

Friday, March 27, 2015

Boys Rule Scrapbooking Kit.. and the men in my life


Hi everyone... I am back again as Guest Designer with Boys Rule Scrapbooking Kits.
Today I am sharing 2 pages sharing photos of the men in my life.


This photo is my husband and 2 sons who you could often find on the outer edges of 
many a soccer field watching my sons children playing many games. It was nice that 
they all went to many of each others games. 
This starburst background base paper was perfect for my page.


Sometimes with the open space pages you can ground the photos and accents by adding
some kind of base by adding a border. On this one also added star burst looking twine
 pattern and a cute cluster of accents


This close up details some more small fun clustered groupings of fun stickers and cardstock die cuts.


There were so many stickers and alphas to chose from which made trimming projects so easy.


More accents and in the upper corner of the page I used micron 01 black pen and doodled stitches.

*********************************************


My Hello page showcases me and my sons. It's not often we get a great photo of the 3 of us
especially with smiles on our faces. I cricut cut the star burst to start as a base for the photo along
with a zigzag border.


Lots of fun and bright coloured alpha, stickers and cardstock die cuts to accent this page.


Such an easy cluster topped off with some wrapped twine tied with a blow.

Thanks for stopping by.... be sure to return often as my guest spot is just beginning 
and I have lots more to share over the next 2 months.


Photobucket

Thursday, March 26, 2015

March has been SHOE month at Robin's Nest


March has been SHOE month at Robin's Nest. Be sure to visit their blog for the full
blog reveal... a great card and yes.. a shoe with instructions.
Here are my sneak peaks.....

Sure happy to have shared with you today. Come back again for sure.


********** Be sure to mark your calendars ***********


Monday, March 23, 2015

Bella Creationz Timeless Twine and some fun projects


At Bella Creationz today I am having so much fun with their new products
and am happy to share 2 cards today.
Up first is the Hello card. It started with the embossing of the new gold metallic sticker 
sheet to fit the size of the card base.
The background base was spiratically inked and then stamped using both ink and glossy accents in opposite corner twice to outer corners leaving room for the embossed piece.
Twine was wrapped around 3 times and then after lightly tracing the word Hello I glued twine
to cover and say Hello.
For finishing touches I added both star and circular sequins.

Supply List:
Base card: misc
Paper: Bella Creationz Gold Metallic Sticker sheet
Twine: Bella Creationz Black Kraft bakers Timeless twine
Stamp: Bella Creationz Camera Stamp clear set
Embossing Folder: Sizzix
Ink: Tim Holtz ranger
Glossy Accents: ranger


*********************************************

For my 2nd simple, easy and fun card I used a stamp but inked it with 3 shades on a base card.
Notice I offset this part of the image.


After that I ink stamped a butterfly and sentiment.


To the right side I matched a cardstock panel close in colour to the inked image.
I wrapped solid twine to centre and on either outer edge wrapped with varigated twine.
The butterfly then needed a flight path made from some twine,
This is a simple but elegant style card and easy to make.

Paper House Wedding BLOG HOP is starting today


I am so excited to be part of the daily Paper House Wedding Blog Hop.
My project is using the Paper House amazing themed background paper.
I then grabbed a smaller sized pad of Paper House for the accent layers in 
many contrasting colours being pulled from the background.

Supply List:
Paper: Paper House Built for Two, P-0607, Romance PP-0611Stickers: Paper House Canvas STCA -0004, 3D STDM -0133Accents:Creating with DetailsInk: Tim Holtz


In the close ups you get to view the amazing accents. Paper House has
stickers, 3D, Cork'd and canvas along with so much more.


These acrylic type accents are part of the collections.


The main cluster has added lace, bling and flowers along with another 3D Paper House sticker.
This is just a start to the blog hop .... be sure to visit Paper House Blog daily and view what the 
rest of the design team has to share with you.

Photobucket

Sunday, March 22, 2015

Boys Rule Scrapbooking Kit for March/April... don't miss this one


Hi everyone... I am super excited to be a Guest Designer with Boys Rule Scrapbooking Kits.
Making fabulous projects is easy when the mix of products is so awesome... 
the great colours, prints on double sided papers, super alpa choices, 
die cut accents along with super stickers.


This fun birthday paper was very dark so I started by adding Sparkle Mod Podge. After it
dried I added some gesso with texture  to outer section of paper.. below the upper title section


You can view the sparkle a bit better in this photo. I used lost of layers and many sections
with lots of clustered accents. All the colours were perfect to pop things off the paper along
with the birthday photos.


In these close ups the yellow alpha was a great element with pop of colour.


More alpha title #s along with some stickers in this cluster and some twine finished this corner off.


This view showcases the many colour layers using both paper and stickers.


This last close up has a great cluster of fun stickers and die cut embellishments.

*********************************************
Up next is a super cute Birthday card.
I used the Happy Birthday print to start the bottom base. 
The fun cut away from the bottom of papers was a perfect border.
The kit came with the Jillibean Cool as a Cucumber cardstock die cuts.
Using the triangle pieces I started with a cricut cut border cut to the same size as the die cut triangles.
I glued 3 on each side leaving space for the sticker alpha to add the sentiment.
Using Bella Creationz Timeless twine and a few more clustered tag stickers
 I accented the centre border.


Thanks for stopping by.... be sure to return often as my guest spot is just beginning 
and I have lots more to share over the next 2 months.


Photobucket