Showing posts with label Carta Bella. Show all posts

Saturday, April 21, 2018

Best Wishes using Carta Bella Flora


Hi .. How are you today? This DT project for Dies R Us showcases a Best Wishes card using Carta Bella Flora paper pad to make lots of layers, die cuts and a fabulous finished card.

Supply List:
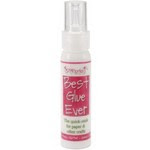
Glue: ScarPerfect Best Glue Ever
Machine/tools: Big Shot Express, Misti
Other: Cardstock. Ink, Flair Buttons


For this card I pulled lots of papers to mix and match, Die cut accent and sentiment pieces and some stash accents. All the paper edges were inked ready to layer.


Started the layers.. matted some for extra pop of colour and depth and demension too.


Put thing together to create my card using ScraPerfect Best Ever Glue.


Close up for your viewing of all the amazing colours in paper and the fab dies cuts used.


Don't forget to come join in the fun at the Dies R Us Challenge Blog.  There's a new challenge theme offered on the 1st and 15th of each month and one lucky randomly drawn winner will receive a gift voucher prize to the Dies R Us Store.  For your convenience, all the important Dies R Us links are provided below.
click below for:

Thanks for visiting... hope to see you again soon, Have a great day.

Thursday, February 1, 2018

Creative Embellishments challenge for February with Sketches in Thyme Sketch


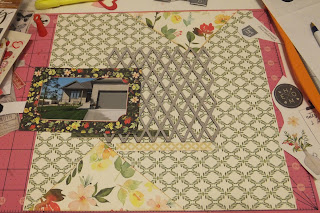
Hi Bev here.... I am sharing a photo of our new home with you on this page. It is based using the Harlequin Lattice inked chipboard. I added lots of floral print flowers from the mood board and the twist is the clipboard looking accent with handwriting on it.(see below) The fabulous green tied bow is accented with the vintage flourish set 2 which is ink covered. The title is scrabble type Alphabet Block letters. This page is trimmed with some fab fun stickers and accents along with the Seasons Change Flair button which is added to a cluster.


For this fabulous layout I used Sketches in Thyme February sketch challenge. (see below).


I  started with the amazing Harlequin Lattice inked background base for this page.  Using the floral prints i started the main design from the sketch.


The flourish is inked green to match the ribbon tied into a bow.


Lots of accents pulled and arranged along with many Creative Embellishments chipboards and the flair button.... all made into fabulous clustered sections.


Above shows the Alphabet Block scrabble looking title, the lattice and the flair button.


Great clustered section.


Bow tied and fabulous inked flourish accent.


Main section still showcases the new house photo.


The sticker clipboard has the hand written section for the twist.


Thanks for stopping by. Hope you have time to visit both blogs and play along with our monthly challenges.


Monday, November 27, 2017

Believe - Merry Christmas using Happy Medium Christmas Kit from Creative Escape Papercrafting


Hi Bev here again. I am using Happy Medium Christmas Kit from Creative Escape Papercrafting to create lots of cards to share with you. What a fabulous mix of colours, patterns and accents. It makes creating so much fun and so easy.


Description

Our level 2 price point kit is anything but average.  It features a 4″ x 6″ sheet of stamps containing 7 images.  Also included are a “Believe” die and a full sheet of 8.5″ x 11″ gold mirror card perfect for die cutting, embossing, or layering.  There is plenty of card stock and specialty paper, as well as special features like journaling cards, borders, and stickers.  Last but not least, we included a Candied Apple Distress Oxide!
The kit includes:
1 “Silent Night” stamp set by Kaisercraft
1 Essentials by Ellen “Believe Script” die by Julie Ebersole (approx. 2.5″ x 0.75″)
12 Sheets of 6″ x 6″ double-sided specialty paper from the Carta Bella “Christmas Delivery” collection by Details2Enjoy
1 12″ x 12″ sheet of Journaling Cards from the Carta Bella “Have a Merry Christmas” collection by Carina Gardner
1 12″ x 12″ sheet of Christmas borders from the Carta Bella “Have a Merry Christmas” collection by Carina Gardner
1 12″ x 12″ sheet of element stickers from the Carta Bella “Christmas Delivery” collection by Details2Enjoy
1 Ranger Ink Candied Apple Distress Oxide by Tim Holtz
1 Creative Escape Glam Metal Sequins Mix (approx. 1 tsp)
3 Sheets of 8.5″ x 11″ white card stock
1 Sheet of 8.5″ x 11″ red card stock
1 Sheet of 8.5″ x 11″ green card stock
1 Sheet of 8.5″ x 11″ oatmeal card stock
1 Sheet of 8.5″ x 11″ gold mirror card
1 Sheet of 8.5″ x 5.5″ alcohol marker paper
1.5 yards of black and white twine
1.5 yards of gold twine
1.5 yards of red ribbon
40 Red 3 mm adhesive gems
24 Gold 6 mm adhesive gems
Note: All 12″ x 12″ sheets have been cut down for shipment

For this card I choose the journaling card and matted it and cut a green mat to match for the card base colour.
I
 

I then cut the print pieces to fit the base... some fun prints and stripes look great together.


I prepared the centre piece with foam to pop it and matted a die cut Sentiment. 


I decided to add another red ribbon to the bottom section.


Finally deciding on the finished design I glued together all the pieces and added the last red tied bow accent. It's amazing what you can do with just pieces of a kit.

Thanks for stopping by... see you again soon.


Saturday, November 25, 2017

Best Wishes Card using Creative Escape Papercrafting products


Hi Bev here again. I am using Happy Medium Christmas Kit from Creative Escape Papercrafting to create lots of cards to share with you. It is so easy with this kit that has great paper combo, fab accents and amazing trims. It is awesome to create with.


Description

Our level 2 price point kit is anything but average.  It features a 4″ x 6″ sheet of stamps containing 7 images.  Also included are a “Believe” die and a full sheet of 8.5″ x 11″ gold mirror card perfect for die cutting, embossing, or layering.  There is plenty of card stock and specialty paper, as well as special features like journaling cards, borders, and stickers.  Last but not least, we included a Candied Apple Distress Oxide!
The kit includes:
1 “Silent Night” stamp set by Kaisercraft
1 Essentials by Ellen “Believe Script” die by Julie Ebersole (approx. 2.5″ x 0.75″)
12 Sheets of 6″ x 6″ double-sided specialty paper from the Carta Bella “Christmas Delivery” collection by Details2Enjoy
1 12″ x 12″ sheet of Journaling Cards from the Carta Bella “Have a Merry Christmas” collection by Carina Gardner
1 12″ x 12″ sheet of Christmas borders from the Carta Bella “Have a Merry Christmas” collection by Carina Gardner
1 12″ x 12″ sheet of element stickers from the Carta Bella “Christmas Delivery” collection by Details2Enjoy
1 Ranger Ink Candied Apple Distress Oxide by Tim Holtz
1 Creative Escape Glam Metal Sequins Mix (approx. 1 tsp)
3 Sheets of 8.5″ x 11″ white card stock
1 Sheet of 8.5″ x 11″ red card stock
1 Sheet of 8.5″ x 11″ green card stock
1 Sheet of 8.5″ x 11″ oatmeal card stock
1 Sheet of 8.5″ x 11″ gold mirror card
1 Sheet of 8.5″ x 5.5″ alcohol marker paper
1.5 yards of black and white twine
1.5 yards of gold twine
1.5 yards of red ribbon
40 Red 3 mm adhesive gems
24 Gold 6 mm adhesive gems
Note: All 12″ x 12″ sheets have been cut down for shipment

This card started with the Sheep Ski Design digital image which I copic coloured and die cut using a Tutti nesting tag die. I then cut more sizes of the nesting die using papers from the kit. Lots of fun layers and super use of the silver glitter sheet. I tied them off using gold and silver ribbon from my stash.


Lots of layers in the background too for more colour and depth. I then added the washi tape border in gold and die cut the sentiment in gold glitter paper.


I added some white brads to the right side corners.


The card has fun and bright colours and lots of layers.. really easy but it looks great.
Thanks for stopping by... see you again soon.


Monday, June 17, 2013

Let's Get Sketchy


What a great sketch by Brenshevia.. and the Carta Bella Collection made it
fall together. I substituted the extra photos with fun accents.


Lots of fun layers, twine tied corner, mated Title and some brads and 
a touch of stitching are great accents to compliment each other.


In this close up it shows the stitching, the journaling strips 
and a closer view of the details on tag section.
Be sure to stop over at Let's Get Sketchy and view
the amazing work of the other DT.

Photobucket

Saturday, June 8, 2013

Let's Capture Our Memories


Today I am using this fabulous sketch below from Let's Capture our Memories and Melissa.
I flipped it sideways to get more sports photos on the page and wanted to also
add a circular photo instead of a circular embellishment.


I used Carta Bella - Beautiful Moments collection for a sports page 
but loved the way it turned out.


In the close ups I'll share some of the details. In the above photo you can
see the added banner and the addition of twine. The title
is partly chipboard and some stickers.


In this section you can see the added ticket stickers from the collection, a
scalloped border cut from the paper, a border of stars and some fun brads.


In this last close up I have the stared border cut to accent the corners of the paper,
added a popped up bird to the banner with twine added.

I guess what I liked best about this page was the fact that a normally
soft, flowery and feminine paper line looks great on this sports page.
When you do as many sports pages as I do .. your always
looking for something new to try.

Photobucket