Thursday, March 31, 2016

April's Challenge at Off the Rails


Welcome to my blog today using the fabulous mood board from the Off the Rails Scrapbooking challenge for the month of April. The colours were perfect fit for my Grand Children's photo.

Supply List:
The Rubber Buggy Products
Paper: Blue Fern Studios Frolic Collection
Ink: Tim Holtz ranger
Chipboard: Blue Fern Studios Mod Squares
Markers: Copics
Stamp: Blue Fern Studios Shabby Edges
Punch: Martha Stewart
Bling: Recollections
Other: doily, pen, paint, lace, rubon sticker


Our sponsor for the month is: Memory Maze


                          "Water Colours"                                     


Be sure to play along with us, link and share with us so we can view and comment on your project.
Thanks for visiting today.. and see you again soon.


Photobucket

Sunday, March 27, 2016

The Rubber Buggy - card stamping and frames


Welcome to The Rubber Buggy blog post today. I am sharing this video tutorial along with still shots to show you how I created these 2 cards. Both have a framed edge but done differently.

Supply List:
The Rubber Buggy Products
Ink: Memento
Markers: Copics
Other: cardstock, card base, Signo white gel pen


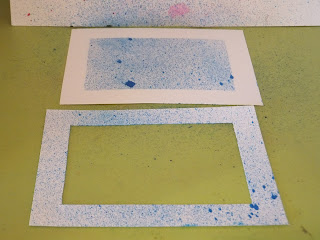
To create this first card and it's frame I cut the frame in middle to fit the base. 


I misted on top of the frame placed over the base.. and when done.. remove carefully leaving the white outer edge frame.


Stamp the flowers and copic colour them.


Matt the finished image and pop up the matted sentiment.


Here is the finished card with the fabulous white frame.
Notice the signo white gel pen accents to finish the copic coloured flowers.

****************************************
Here is the 2nd card for your viewing.


This card is missing the frame but after colouring and shading it all it is put on a larger white base which is then matted for colour and layers.


Thanks for joining us today.. be sure to come back again.


Saturday, March 26, 2016

Classic Sunflower Collection - Heartfelt Creations - Cards with video tutorials


Hi .. super excited to share 2 projects with The Rubber Buggy DT today. Making cards are fun and easy. They also are a great project to create using the left over stash and pieces from your collections. It is also great to try some of the different shapes, sizes and styles of cards. Today I am sharing 2 cards - an easel card base and a shaker card.


We'll start with the easel card.

Products Used:

The Rubber Buggy Products
Paper: Classic Sunflower Collection
Chipboard: Blue Fern Studio geometric bits
Ink: Tim Holtz 
Other: cardstock, ribbon, copic marker

Watch a video and see more details shots below.

Here are a few up close view for details and some shots to make following the instructions easier.


Start with making the front of card on a card base.
Make the inside base for the card.


Now work on shape of easel card .. Easy inside applied.. and then the front panel gets folded over for the front easel panel.


Here is a straight on view of the finished card. Notice that the ribbon is a great border to help hold the front panel at about the midway point on the bottom base.


Instructions: Starting with an easel card base and the extra front piece to fit your card. It’s easiest to make your card front complete and then add it to your card base. Pull mix and match papers with some fun accents like the frame, tag, border edge, sentiment and fussy cut the butterfly. Cards are so much prettier when they have layers to depth, texture and colours. Switch them out from light to dark and plain to print. In all edges for colour and depth. For my front I work backward form the frame piece to a matted background and then forward with the chipboard with ribbon accent, a large fussy cut butterfly and the tag that I added the brad, small fussy cut butterfly and the sentiment grouping. When that was done I added it to the front half panel of the card base. 

Up next is the inside section of the stand up card.  I like to finish this section off as a separate section to complete and add to base when done also. (when you mess up you can start again with ease) This piece has a full background that I added a fun sunflower print piece topped with ribbon and bottom had a thin border piece that I added the 2ndsentiment verse cut off the paper collection. Try to use some kind of border, punched edge or ribbon about the half way mark to help support the stand up of the front base.

Ink all edges for colour and depth. When all done glue it to the base. 
Everything folds flat to fit an envelope but the front half fold allows for the easel stand up base to display your card.
**************************************************************


Here is my shaker card.

Supply List:
The Rubber Buggy Products:
Paper: Classic Sunflower Collection
Flowers: Wild Orchid mixed 10mm flowers
Leaves: Wild Orchid Green Mulberry paper leaves
Other: Cardstock, lace, gem stones, Robin’s Nest dew drops

Watch a video and see more details on the close up shots below.


Here are a few up close detail shots for your viewing.


Your card shape and size will vary from the plastic mold you are using.


Inside of the molded plastic using pattern paper for great design behind the dew drop shakers.


Custom make the inside to your liking.


More detail pieces to create the inside of your shaker.


Organize your beads, dew drops / shaker pieces.


Place shaker pieces on centre of base... now glue down the cover firmly. Do not move around until totally dry.. so beads don't stick to inner edges.


Instructions:
Starting with a used piece of plastic packaging shaped with a lip to allow the insertion of dew drops, beads or sequins.... we will make a shaker card. My plastic piece measured about 4 x 4” and it also fit the one section of patterned papers for a perfect frame with some slight adjustments. Using the proposed framed section I added some lighter print paper, a light mat and dark mat… so my finished card is about 5.5 x 5.5” square.
First finish designing the inner square design. I added the fussy cut sunflower and the Sunshine sentiment and inked the edges. Glue down firmly to the outer edges and let the glue dry. ( so the shakers won’t stick) Place the shakers – I used dew drop inside the centre section and glue done the plastic dome cover firmly and let dry. The outer edge sometimes need to be covered depending on how it came off the packaging. I used another piece of frame from the paper collection that just happened to fix exactly…. Or you can cut your own piece to custom fit. With this done then I accented the outside with some off the edge flowers, lace and gem stones.
You would have the option of making the front of the shaker and then custom cutting your card base from cardstock to fit exactly. Sometimes they will require custom cut envelopes depending on the finished size.

Thanks for stopping by.. see you again soon.


Friday, March 25, 2016

Robin's Nest ... Fishing and Outdoors


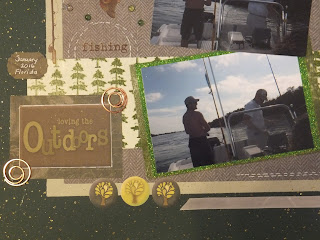
Hi today I have a great guy masculine fishing/ outdoors page. Robin's Nest has the best collection to create with.

Supply List:
The Robin's Nest Products:
Paper: Forest Trees Specialty paper, Hunter Green Glitter CS,  Black Herringbone CS, Silver Castle Glitter CS,
Chipboard: Glitter
Dew Drops: Black Forest Mini dew drops
Rubons: Fishing
Stickers: Outdoors 
Ribbon: Leafy green/grey
Other: brads, white signo gel pen doodling


In the close ups you can view more in detail. This section shows the amazing layers, the stickers accents that are available and the added metal accents.


The rub on fishing accents are amazing. They were perfect for this page. Notice all the fabulous layers adding colour, depth and contrast to the page and fabulous backing to the fun photos. I also added a few brad accents.


Here is a great photo showing all the perfect accents, the words, drew drops , photo matting and some circular doodling using white gel pen. .. its awesome for this guy page.


I used the same collection to create this fun masculine card for Feeling Sketchy earlier but didn't share it on the Robin's Nest blog.. so adding it here because it's fun to create cards using scraps from the larger project.  I used Robin's Nest Lodge Collection with some fun trees, and pattern papers in shades of grey, green with splatter and great sparkle chipboard along with a few camping stickers that worked perfectly. Added some twine, dew drops and doodled a bit too.It's always fun to hand write the sentiment to add the personal touch too.

So glad you could stop by today.. see you again soon.

Photobucket

Thursday, March 24, 2016

Robin's Nest sneak peak to a great masculine/ guys/ outdoor project


Hi today I have a great guy masculine fishing/ outdoors page. Robin's Nest has the best collection to create with. This is just the sneak peak.. so be sure to stop by the Robin's Nest blog for the full reveal.


Photobucket

Monday, March 21, 2016

The Rubber Buggy show casing Classic Heartfelt Creations -Sunflower Collection


Today I am sharing fabulous family pages using products from The Rubber Buggy. This is the Classic Sunflower Collections from Heartfelt Creations. My favourite thing to do is create family memories to give to them preserving memories custom made by me.

Supply List:
The Rubber Buggy Products
Paper: Heartfelt Creations Classic Sunflower Collection
Chipboard: Blue Fern Studio Mod Squares
Ink: Tim Holtz ranger
Other: Robin's Nest glitter title, brads, twine, Bo Bunny jewels, modeling paste, stencil, mesh, Gina Designs doily

Watch a video I made for this layout.


Here are some close up shots for your viewing too.


Instructions: Starting with your background paper choice.. pull at least 3 accent choices for layering. Grab some tag, ticket, photo frame and fussy cut optional pieces and a title you make yourself or from your stash.  First you'll place your photos in the vicinity on the page so you can size and layer the accent papers. I worked one photo into a collection frame but cutting it down a bit. When layering it's best to layer in light to dark or soft and bold so each layer pops. I ran the dark brown/read piece across the back, added the right side piece under the unmatted photo and spaced the framed photo to the left side. At the upper edge of the previous layers I added the fun word print piece and just slipped the edge under. When working with layers it's best to ink all the edges so each piece has a defined edge. In the upper right corner I fussy cut the sunflowers off a sheet and worked it into the other papers. With the whole background with photos done I choose to add texturing using a stencil and modeling paste. To protect the photos I covered them up and did the stenciling.  While the stenciling is drying you can take time now to gather some possible accents for your page. More is better and you can change things up as you go along. I chose to cluster between the photos with 2 tags, doily, piece of mesh and tied off tags with a brad and twine. Next I copic coloured the chipboard base first and then added liquid pearls for more sparkle. In 3 locations I added pearls and bling, I added a ticket accent and finally the glitter title. I always try to make sure that the photos pop off the page and to decorate without losing the fabulous designs in the papers. Just enough of everything is perfect on any project.

*****************************************************************************


Supply List:
The Rubber Buggy Products
Paper: Heartfelt Creations - Classic Sunflower Collection
Other: cardstock, twine, Bo Bunny jewels, stickles, flowers, ribbons, cardstock, gold film accents


Here are some close up shots for your viewing too.


Instructions: Start by choosing your background, papers that match, some cardstock, your photos, title and possible accents from both the collection and also your stash. Decide on the photo positioning and cut and size some layers for below the photo and some small pieces to float under the photo also. When the background print is so awesome you don't want to cover it all. The one I choose had great sunflowers in the upper right corner that would not be covered. The left side was open from print so I added a cardstock border, matted the photo and added a small piece above the photo. All these add depth and dimension to the page. The decorated border from the collection was perfect to base the photo. I die cut the cardstock accent to the right of photo and the paper collections great accents had the fun tag with I matted and clustered with a gold film accent and tied them off with twine. Fussy cut butterflies were placed on page some flat to page and some popped up. The title and heart are more gold film accents. Lots of stickles added to sparkle the page and the small cluster of flowers with a double ribbon bow were the finishing touch.


Thanks for visiting and hope you'll take time to visit The Rubber Buggy Store to view all the amazing products they have to sell.